Introduction
The basics of using an Addressable RGB LED Strip (sometimes called a "NeoPixel" Strip) with the Bit Board and micro:bit
Video Overview
-
-
A typical LED (like we use in our Paper Circuits projects) just needs a power source to light up. It’s simple, and probably the quickest & easiest way to get started building circuits and lighting things up.
-
We also have very simple LEDs as part of our Crazy Circuits system. These are brick-compatible circuit boards with a jumbo 10mm LED on them that you connect using our 1/8” conductive Maker Tape.
-
Both of those style of LEDs just turn on and turn off, and tend to be just one color. (We do have some color changing LEDs, but you can’t control them. A small controller chip inside the LED makes it cycle through colors.)
-
But what if you want to choose the color an LED shows? And what if you have more than one and want to control them all individually? Well, that’s where Addressable RGB LED come in!
-
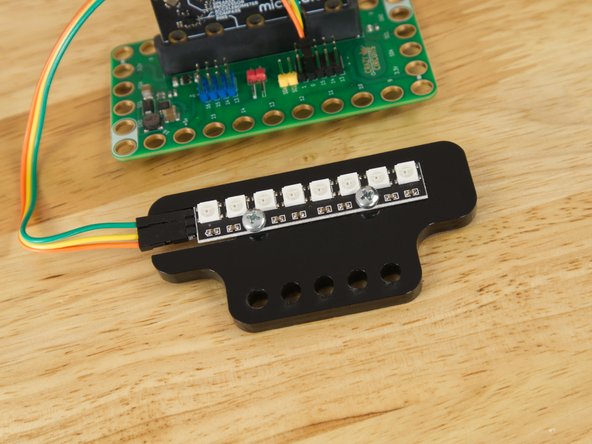
Our Addressable RGB LED Strip consists of 8 WS2812B LEDs, each capable of showing any color that you can create by mixing Red, Green, and Blue. (That’s the “RGB” part!)
-
WS2812B LEDs are sometimes called “NeoPixels” which is an easier to remember name than a string of letters and numbers. (The term “NeoPixel” refers to the Adafruit brand of addressable LEDs. Check out their NeoPixel Überguide if you want more details.)
-
The "Addressable" part means you can control each individual LED! You can make the first one red, the second one green, the third violet, and so on.
-
-
-
The magical thing about these “Individually Addressable” LEDs is that you don’t have to connect each LED to an individual pin on your micro:bit, you just need one signal wire along with power (positive and negative) to light things up.
-
So let's get connected! If you turn the Strip over you'll see labels for the three pins. You should see IN, VCC, and GND.
-
Use 3 F/F Jumper Wires to connect to the pins on the Strip. Make note of what color goes to what pin.
-
Now connect the other end of each Jumper Wire to the following pins on the Bit Board.
-
Connect VCC to any pin in the + (positive) row.
-
Connect GND to any pin in the - (negative) row.
-
Connect IN to Pin 0 on the Bit Board.
-
-
-
In the next step we're going to provide a link to some code to get you started, but first let's look at the NeoPixel Extension for MakeCode.
-
The Extension has the basic blocks you'll need to set up the Addressable RGB LEDs and to control them with a micro:bit, and the Bit Board makes it very easy to connect things!
-
-
-
If you've never used a micro:bit before you'll want to check out this guide: Bit Board V2 Setup and Use
-
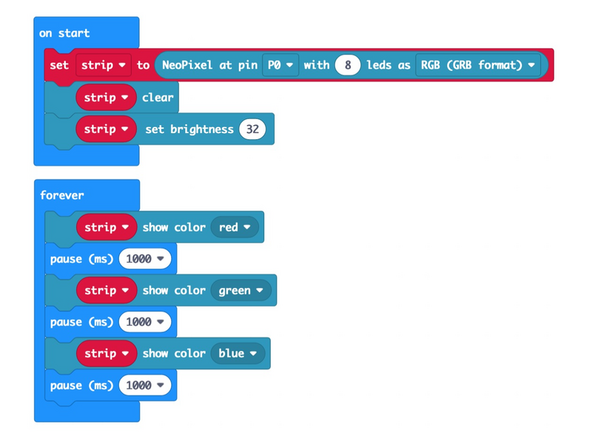
We're going to load the following code for our NexoPixel Demo 01 program: https://makecode.microbit.org/_XoP28gLhp...
-
Note! We've set the brightness to 32 for this demo. You can choose any value up to 255, but be aware the LED strip can be very bright! We'll start with a low value and then you can change it later as you see fit.
-
-
-
You should see the whole strip display red, then green, then blue, and keep cycling through those colors showing each for one second.
-
-
-
Addressable RGB LEDs are a fun way to practice your programming! We've got a few more examples to share.
-
NeoPixel Demo 02 is the classic "Larson Scanner" featuring a red LED going back and forth: https://makecode.microbit.org/_FxAWrUi25...
-
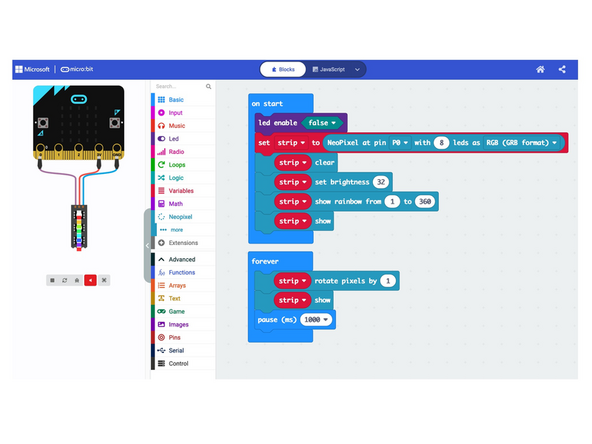
NeoPixel Demo 03 shows a rotating rainbow on the LEDs: https://makecode.microbit.org/_UrKMFiicw...
-
Besides fun light shows you can use the Addressable RGB LEDs to function as a meter or indicator. We'll be adding more guides showing other uses soon.
-
-
-
In MakeCode you can use the micro:bit simulator on the left side of the screen to show you what it will look like once you load the code onto your micro:bit
-
This is a great way to test out different NeoPixel code effects to get an idea what they will look like.
-
Of course seeing the simulation is nowhere near as cool as seeing the actual code running on your micro:bit controlling an Addressable RGB LED strip! 😎
-
-
-
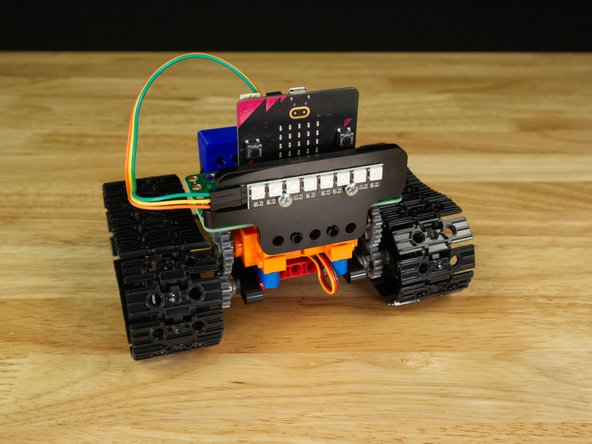
If you have a Bit Board Rover your Addressable RGB LED Strip came attached to a piece of acrylic. This allows it to attach to the front of the Rover using two black pins.
-