
Introduction
The easiest way to blink and LED with a micro:bit is to use the pause statement, but this stops the code from running! This guide will cover blinking without pausing.
(If you've ever used an Arduino you may have seen a "Blink Without Delay" tutorial which is the same concept.)
Video Overview
Featured Document
-
-
Note: This guide shows an intermediate to advanced programming technique. But if all you want to do is achieve the end result, check the last step in this guide for a faster & easier method.
-
Gather your materials. You'll need a micro:bit, a Bit Board, a LEGO baseplate, some 1/8" Maker Tape, and a Crazy Circuits LED.
-
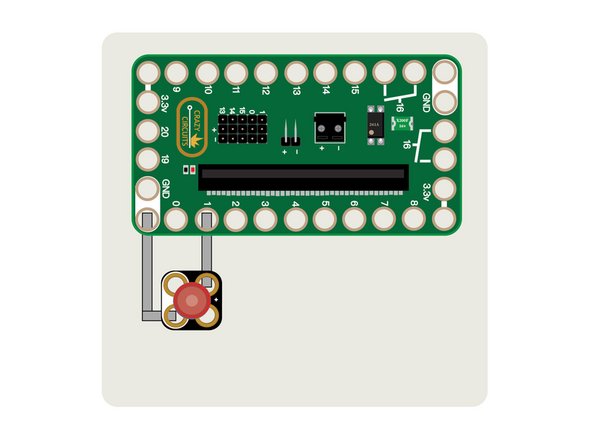
Decide where you'll place your Bit Board onto the LEGO baseplate and then add Maker Tape to GND and to Pin 1.
-
Add an LED so it is connected to the tape as shown. Your circuit is complete.
-
-
-
Insert the micro:bit into the Bit Board and connect a USB cable that is plugged into your computer.
-
We'll be using makecode.microbit.org to program our board. It uses a simple drag and drop block interface. We'll also provide all the example code you need.
-
We're going to load the following code for our Blink With Pause program: https://makecode.microbit.org/_bm60u2ifH...
-
We are starting with code that will use the pause statement so we can compare it to code that does not use the pause statement.
-
Once the code is loaded and running you should see the LED blink. It will turn on for one second, then turn off for one second, and repeat.
-
This program contains very little code, and relies on the pause statement which stops our code from running. This is fine for a single LED, but as we add more components we'll want to avoid using the pause statement.
-
-
-
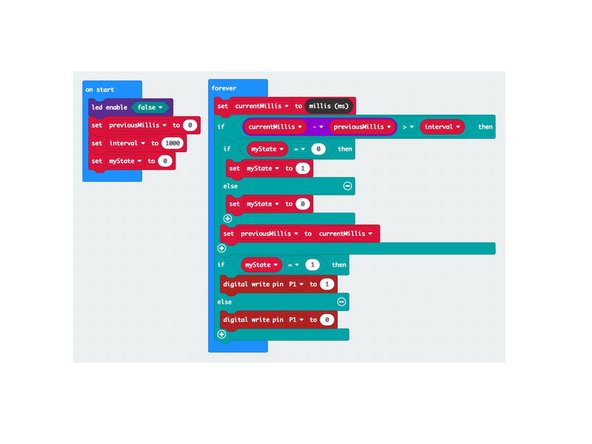
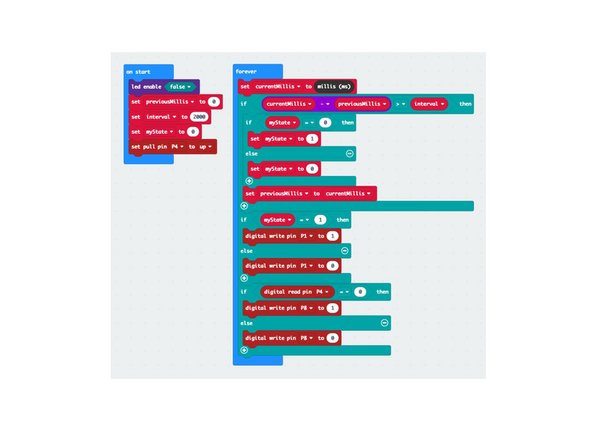
We're going to load the following code for our Blink Without Pause program: https://makecode.microbit.org/_7eXAWECXx...
-
Once the code is loaded and running you should see the LED blink. It will turn on for one second, then turn off for one second, and repeat.
-
While the output looks the same as our previous example which used the pause statement, in this version the code never pauses or stops running.
-
Since our code runs without stopping we can do things like check for a button press or other input.
-
The import takeaway from this code is that a timer starts running as soon as the micro:bit is powered on, and you can use that to keep track of the passage of time and then use that (along with some simple math) to do things like turn on and off an LED at specified intervals.
-
-
-
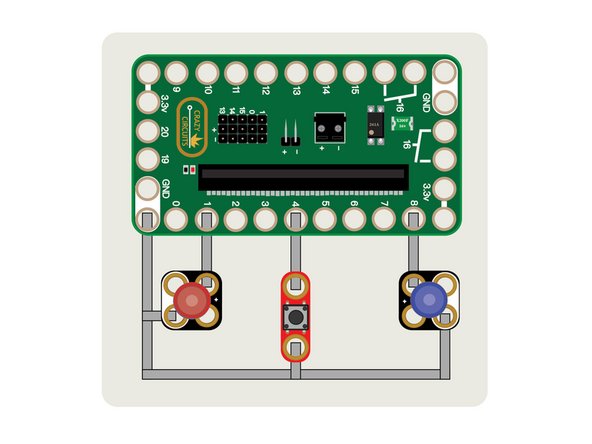
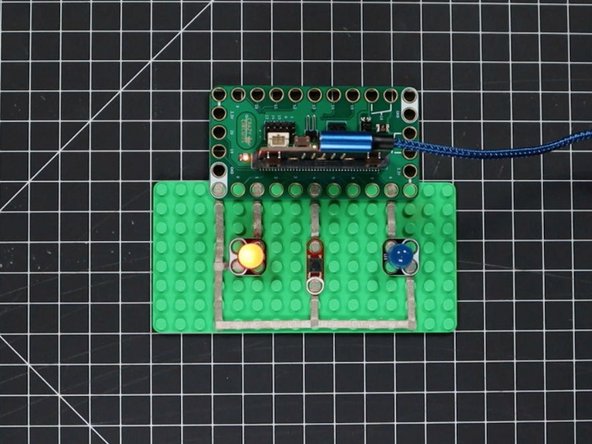
Starting with your existing circuit, we're going to add another LED and a pushbutton.
-
You'll need to add more Maker Tape to connect the new components.
-
The second LED will connect to Pin 8 and ground, and the pushbutton will connect to Pin 4 and ground as shown.
-
-
-
We're going to load the following code for our Blink With Pause With Button program: https://makecode.microbit.org/_2zAUuKRf9...
-
Once the code is loaded and running you should see the first LED blink. It will turn on for two seconds, then turn off for two seconds, and repeat.
-
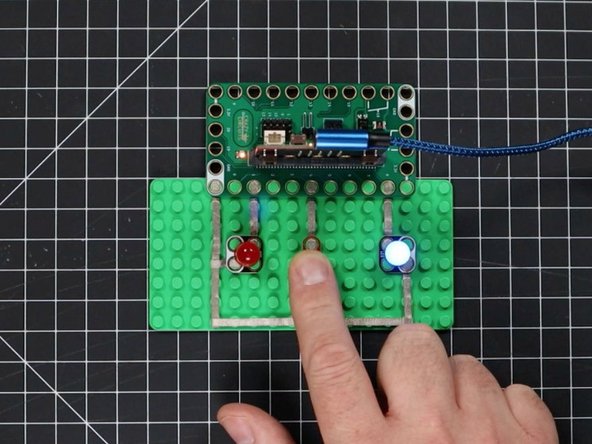
Quickly press and release the pushbutton. If you get the timing exactly right the second LED will turn on, remain on for 4 seconds, then turn off.
-
If you get the timing wrong, nothing will happen when you push the button. This is because the code is stuck on the pause statement when you pressed the button and the code never got a chance to check if the button was pressed.
-
This code clearly illustrates why you may not want to use the pause statement if your code needs to do other things.
-
-
-
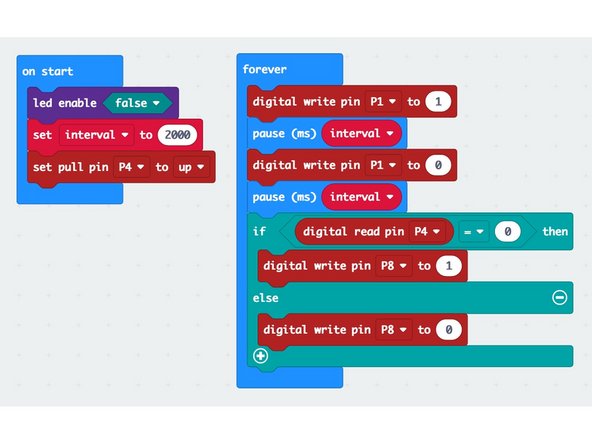
We're going to load the following code for our Blink Without Pause With Button program: https://makecode.microbit.org/_fcYFYYemw...
-
Once the code is loaded and running you should see the LED blink. It will turn on for two seconds, then turn off for two seconds, and repeat.
-
Press and release the pushbutton. The second LED should turn on when you press the button, and turn off when you release the button. The first LED should continue to blink even as you press the button!
-
Try holding down the button. The second LED (controlled by the button) is unaffected by the first LED which continues to blink.
-
The code that works without using the pause statement is a bit more complex, but is the building block of more complex code that can handle more than one thing being controlled.
-
-
-
Now that you understand how to use timing to keep track of when you should turn on and off your LED, you should be able to expand upon the basic concept to do more.
-
Can you add another LED and another button? Can you make two LEDs blink alternately?
-
-
-
The exercise in this guide is good to know for intermediate to advanced programming.... but with the micro:bit there is an easier way!
-
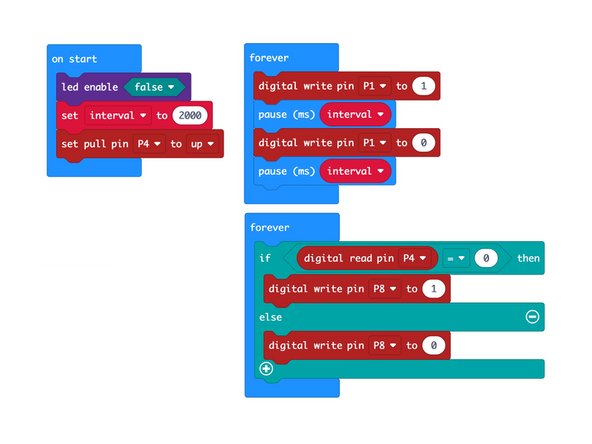
The micro:bit allows for multiple forever sections that run simultaneously. (Well, they appear to run simultaneously due to switching between them quickly.)
-
This means you can just but your different sections of code into different forever blocks, and they run at the same time!
-
Here is some example code, Blink And Pause With Button: https://makecode.microbit.org/_Xm9F977kF...
-


Cancel: I did not complete this guide.
One other person completed this guide.
Attached Documents
