
Introduction
Connect three Crazy Circuits NeoPixels to a Bit Board and control them with code.
We'll explore how to control a series of three RGB LEDs (also called "NeoPixels").
Video Overview
Featured Document
-
-
We'll use Maker Tape to connect the three NeoPixels to the Bit Board on a LEGO baseplate.
-
The NeoPixels need to be chained together. You'll notice the labels DI and DO on each one. These stand for Digital Input and Digital Output.
-
From the Bit Board, Pin 0 connects to the DI (center hole) of the NeoPixel on the left side. We then connect the DO from the first one to the DI of the second one, and so on...
-
Make sure you don't bridge the connection of DI and DO beneath a NeoPixel, or that will short the circuit and bypass that NeoPixel. (If one does not light up, check for this.)
-
You'll also need to connect the three NeoPixels to Ground (GND) and to 3.3v as shown.
-
You'll notice the Ground on the Bit Board (as well as the NeoPixel and other Crazy Circuits components we'll use) is color coded White.
-
The 3.3v hole on the Bit Board is labeled and is actually two holes right next to each other on the Bit Board. (There is a small line showing the connection between them.)
-
-
-
If you've never used a micro:bit before you'll want to check out this guide: Bit Board V2 Setup and Use
-
We're going to load the following code for our Three NeoPixels Random Better program: https://makecode.microbit.org/_AJbH696ac...
-
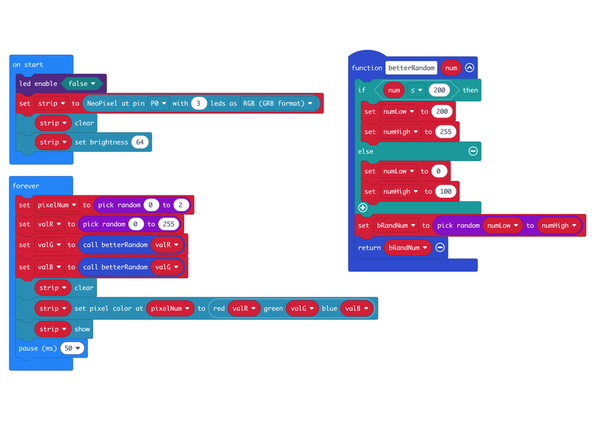
For this example we've just slightly improved the previous example by adding a function called betterRandom.
-
The betterRandom function will attempt to force the RGB values to be higher or lower for more "solid" color versus the more "washed out" colors in the previous example.
-
It's still not perfect! But it does demonstrate a slight improvement in more colorful colors being displayed.
-
-
-
Once the code is loaded it should start running immediately.
-
You can power the micro:bit via the USB cable you used to load the code or you can use a battery pack plugged into the Bit Board.
-
A NeoPixel will light up, then a different one, and so on. Each time a different color will be shown. You may see very similar colors, and you may see the same NeoPixel light up multiple times in a row.
-
-
-
Follow along with our recorded Live Stream!
-
You can watch the full video of us walking through this project, along with explaining and exploring the code: https://www.youtube.com/live/_pM0oZnZ9wQ...
-


Attached Documents
