
Introduction
Program the built-in LED Matrix found on the micro:bit and control it with a pushbutton.
We'll explore how we can control the LED Matrix with a single pushbutton.
Video Overview
Featured Document
-
-
We'll use Maker Tape to connect the Button to the Bit Board on a LEGO baseplate.
-
We'll connect our Button to Pin 5 and to Ground (GND).
-
You'll notice the Ground on the Bit Board (as well as the LED and other Crazy Circuits components we'll use) is color coded White.
-
While some components have Polarity our Button does not. If you connect it the other way around it will still work fine.
-
-
-
If you've never used a micro:bit before you'll want to check out this guide: Bit Board V2 Setup and Use
-
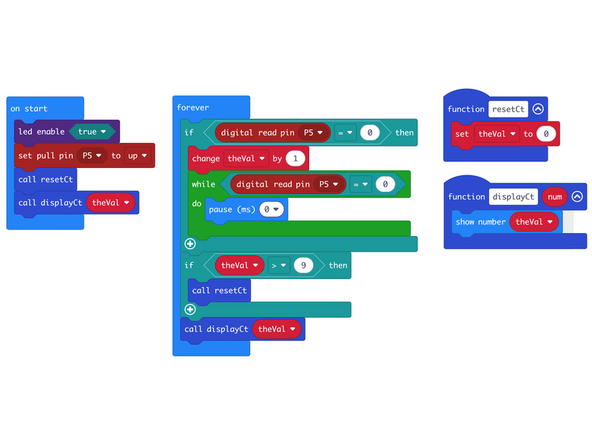
We're going to load the following code for our LED Matrix Counter Button V3 program: https://makecode.microbit.org/_DkH9Yj1aD...
-
Our code will change the number displayed on the LED Matrix when the button is pressed.
-
If the button is pressed more than 9 times the count will be reset to 0.
-
While the micro:bit can display two-digit numbers they scroll horizontally across the screen, making them difficult to read.
-
For this version we've simplified the code a bit and have added functions for resetting the count and displaying the count.
-
-
-
Once the code is loaded it should start running immediately.
-
You can power the micro:bit via the USB cable you used to load the code or you can use a battery pack plugged into the Bit Board.
-
The LED Matrix will show 0, and with each button press the number will increase by one.
-
Try holding down the button... this time the number will not keep incrementing!
-
While we tried to simplify the code for this one, it seems the least reliable at catching button presses.
-
-
-
Follow along with our recorded Live Stream!
-
You can watch the full video of us walking through this project, along with explaining and exploring the code: https://youtube.com/live/geFYVuV-DI8
-


Attached Documents
