
Introduction
Use a pushbutton in place of an on/off switch by utilizing code that keeps track of button presses.
Video Overview
Featured Document
-
-
Let's start by going over what we refer to as switches and buttons, and how they differ.
-
A switch will have two (or more) positions that can be set by physically moving part of the switch, and the switch will then remain in that state. If you slide the switch one direction it will be ON, and if you slide it the other direction it will be OFF.
-
A button works by making contact and closing a circuit only when it is being pressed and held down. When you release the button it breaks the contact and the circuit is no longer ON.
-
Using a microcontroller (a micro:bit in this instance) we can track how many times the button is pressed, and then use that information to control our circuit, setting it to ON or OFF depending on the state of a variable we determine using a mathematical operation.
-
-
-
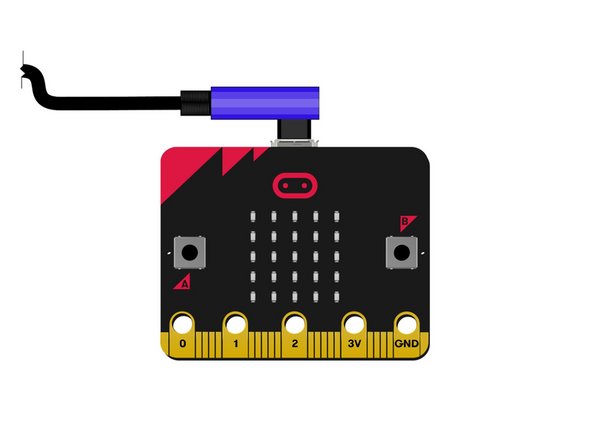
Our circuit is pretty simple.
-
We'll connect a pushbutton to Pin 8, and an LED to Pin 3, and then make sure both of the connect to GND.
-
In this circuit Pin 3 will function as an OUTPUT and turn on (or off) the LED, and Pin 8 will function as an INPUT, and receive a signal from the pushbutton.
-
Both pins 3 and 8 need to be connected to ground to complete the circuit and allow them to function.
-
-
-
Connect a USB cable to the micro:bit and then plug it into your computer.
-
We'll be using makecode.microbit.org to program our board. It uses a simple drag and drop block interface.
-
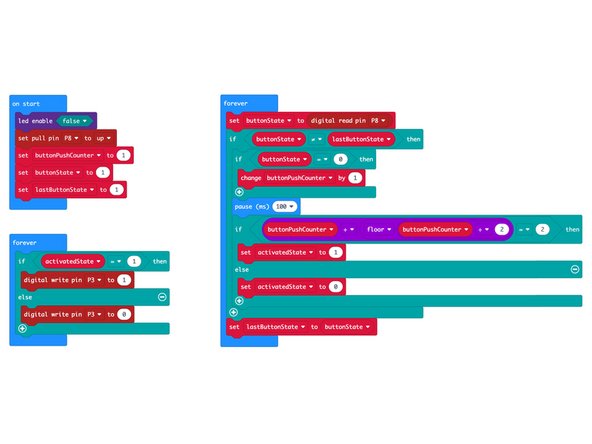
We're going to load the following code for our On-Off Button program: https://makecode.microbit.org/_4d22w86Kd...
-
Since we're just using a pushbutton and an LED we can power our circuit using the same USB cable we used to program our micro:bit - No battery pack needed.
-
-
-
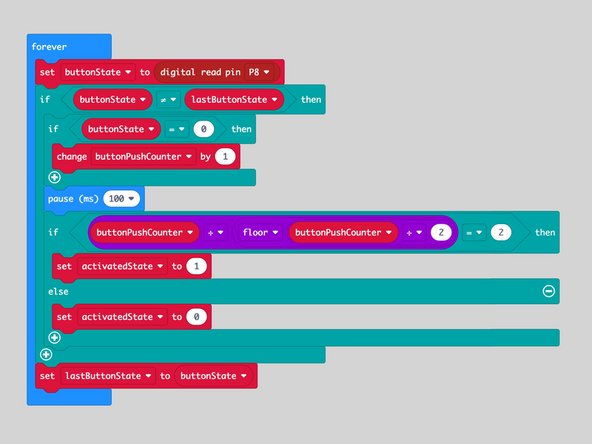
Our circuit works by keeping track of how many times the button is pressed, and then turning on the LED every time we see an even number.
-
So we start our counter at 1, and our LED is set to off. When we press the button the counter goes to 2, and the LED is set to on. From there 3 is off, 4 is on, 5 is off, etc.
-
We also track the previous state of our button, and compare it to the new state of our button so we know when it has been pressed.
-
The code may seem a bit complex, but read through it, and see if it makes sense.
-
Download the attached PDF file to read through the text describing the code in detail.
-
-
-
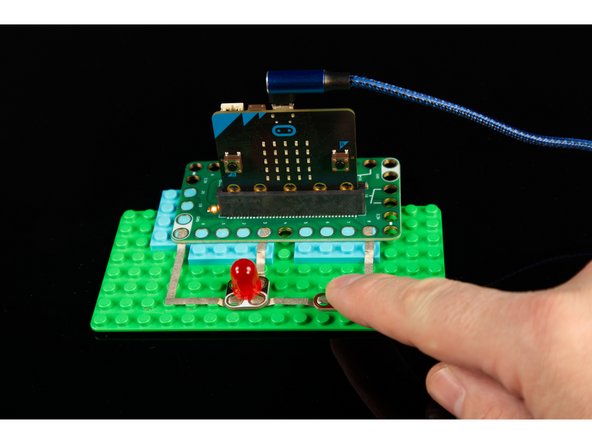
Once you've built your circuit, loaded the code, and have it powered by a USB cable... you can test it out!
-
When you start the LED should be off. If you press the button once it should turn on, then if you press the button again it should turn off.
-
Keep going! Each alternating button press should turn on and then off the LED.
-
You just make an on/off switch using a momentary push button!
-
-
-
If you really dig math, check out the Wikipedia page about the Modulo operation.
-
Can you write code that would check for every third button press, or every forth, or even tenth? It's all just math, really.
-
Can you think of a project where using a button like this would be useful?
-
What if you want to use more than one button like this? You'll need to add more variables to track each button individually, but it shouldn't be that difficult.
-


Cancel: I did not complete this guide.
One other person completed this guide.
Attached Documents
