
Introduction
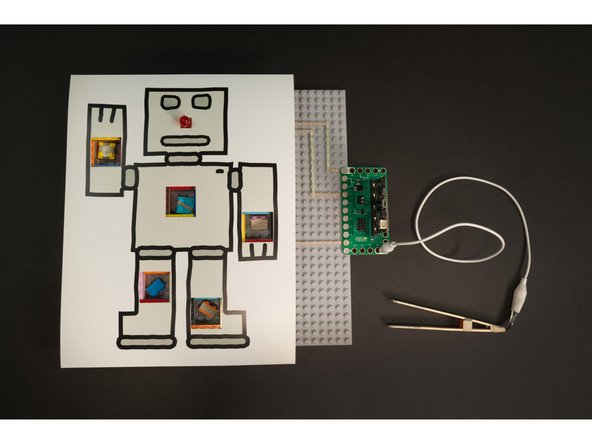
Build a LEGO based Operation Game with our Bit Board and some Maker Tape with a fun Robot as a patient!
Video Overview
Featured Document
-
-
We’re going to build an Operation Game! If you’ve never played the classic game, it involves carefully removing silly objects like a “Funny Bone” and a “Charlie Horse” from a patient using a pair of tweezers.
-
The tweezers are metal and when you are not careful and accidentally touch the tweezers to the side of the pockets containing the objects they make an electrical connection which triggers a light and a buzzer, and you lose your turn.
-
We’re going to build our own version using our Crazy Circuits system including a Bit Board (with a micro:bit controller), Maker Tape, LEGO, and a few other parts.
-
-
-
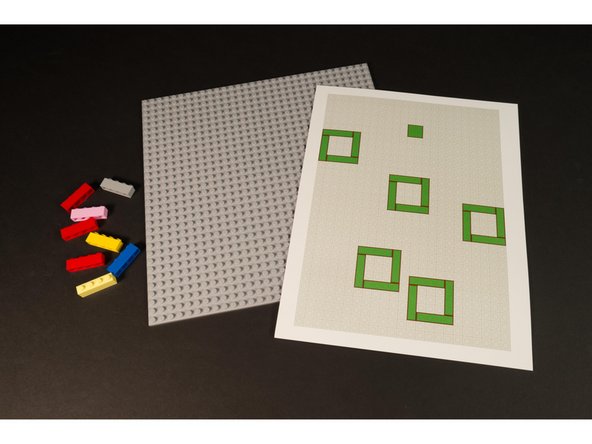
We’ll start with the easy part! Print out the page from the PDF that has a robot on it. You can print the filled in one, or a black and white version that you can color yourself.
-
It’s best to print the robot on heavy cardstock, as it will be the top of our Operation Game.
-
After you print it (and optionally color it) you’ll need to cut out 6 squares. Five of the squares are the same size, and one (for the robot’s nose) is a bit smaller.
-
Once you’ve got your robot ready to go, put it aside! We’ll need it later on.
-
-
-
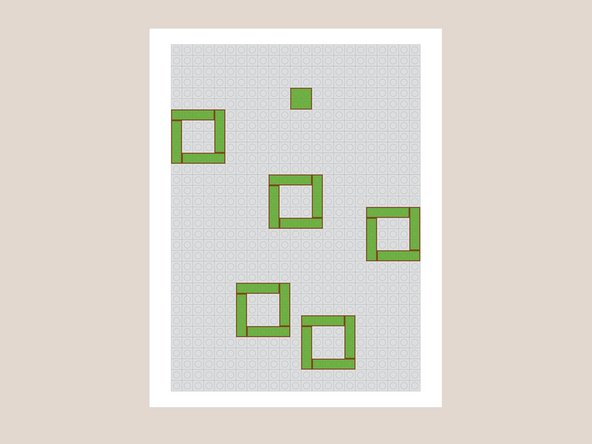
We’ll need a standard 10” x 10” LEGO baseplate to build on.
-
Refer to the second page of the PDF that shows how you’ll need to place your “pockets” made of bricks. It may be helpful to print this page, but looking at it on screen and counting the number of LEGO studs to determine spacing can also work.
-
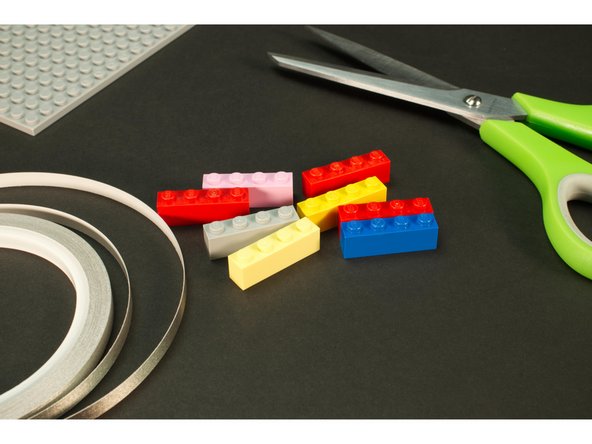
Before we can start putting bricks onto the baseplate we need to assemble our pockets.
-
-
-
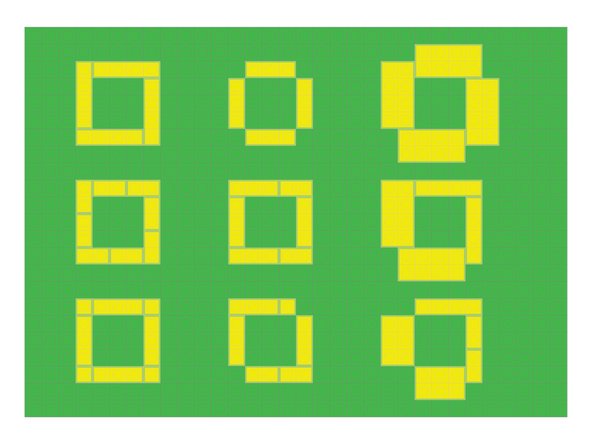
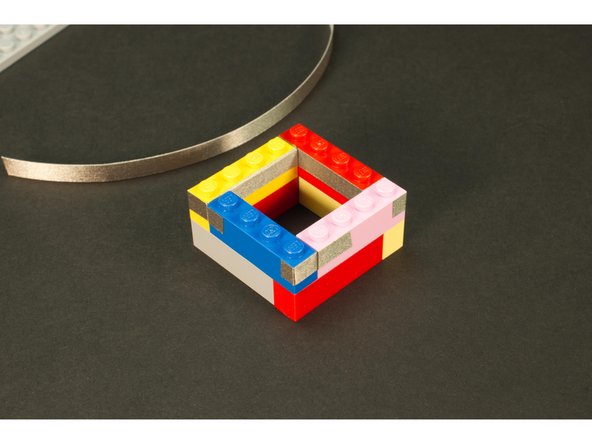
Our LEGO pockets will consists of eight 1x4 bricks assembled into a square.
-
If you don’t have enough 1x4 bricks you can improvise, and use 2x2 or 2x4, or even 1x3 with 1x1 bricks.
-
We’ve found that 1x4 is the easiest to assemble, but you should use what you’ve got available!
-
Note: Check the layout to see where the pockets go. In some places 2x4 bricks may not fit!
-
-
-
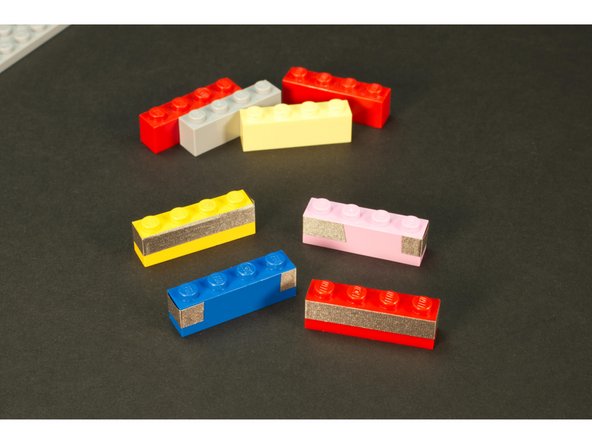
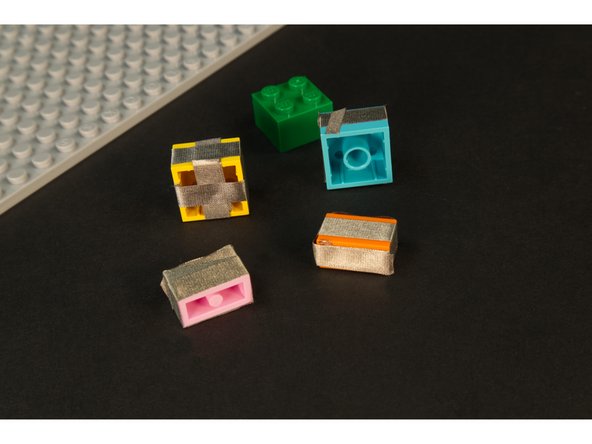
Take four of the bricks and wrap them each with 1/4” Maker Tape.
-
You don’t have to wrap them entirely, but the tape needs to cover one long side and should just wrap around the short sides to the other long side.
-
Assemble into a pocket with the taped bricks on top.
-
-
-
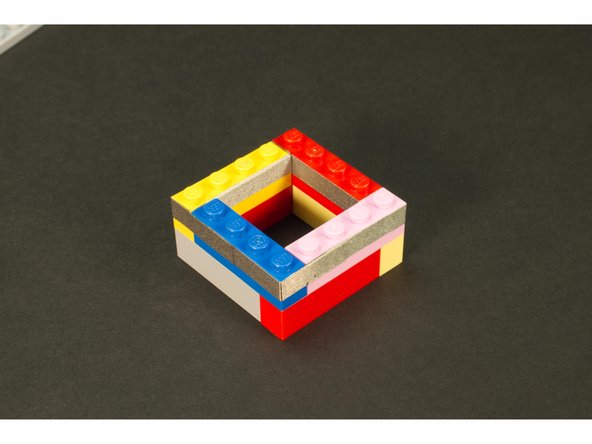
Once you’ve got your pocket assembled you need to add one more piece of Maker Tape around the whole thing.
-
This piece of tape electrically connects all the other pieces together.
-
You can use 1/4” or 1/8” tape for this step.
-
-
-
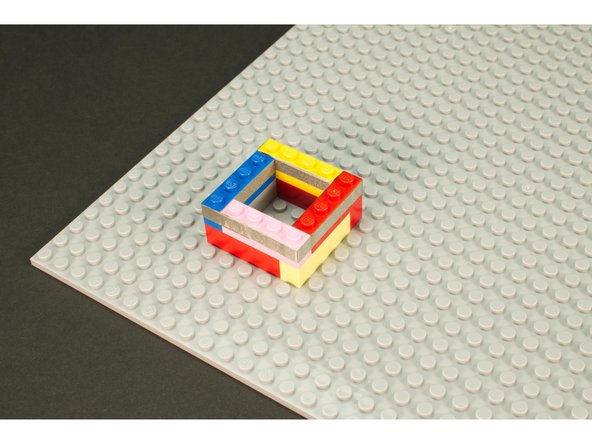
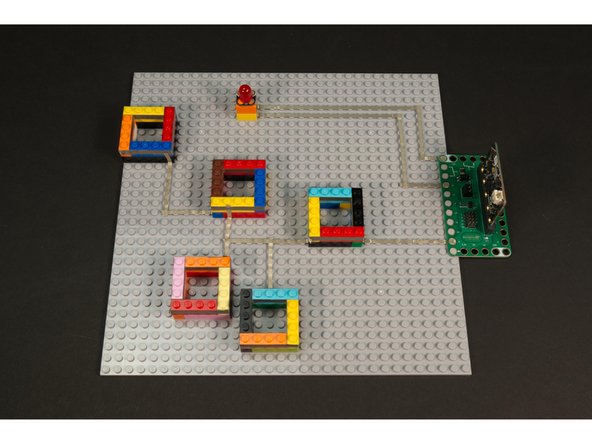
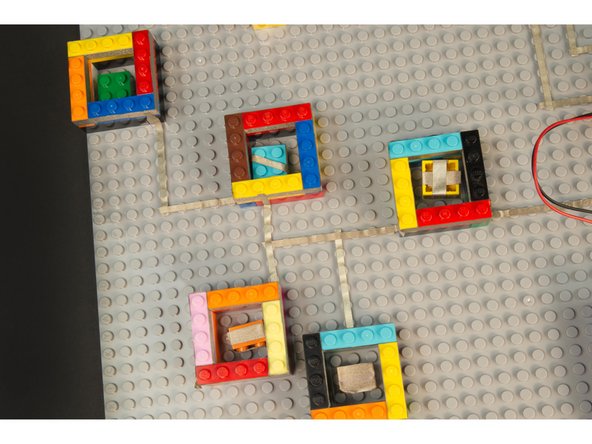
Place the pockets onto the baseplate to match the map.
-
You can check that you have the pockets in the correct position by laying your robot on top of them. The holes in the robot template should be centered over each pocket.
-
-
-
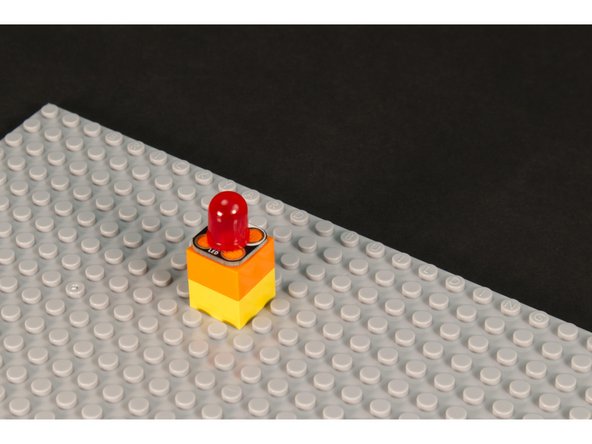
Add a stack of two 2x2 LEGO bricks.
-
You can use larger bricks if you don’t have any 2x2 available.
-
We’re going to mount an LED onto the top of the bricks so it can light up when the tweezers touch the edge of a pocket!
-
Check your alignment again to make sure the LED is in the correct place under the robot template.
-
-
-
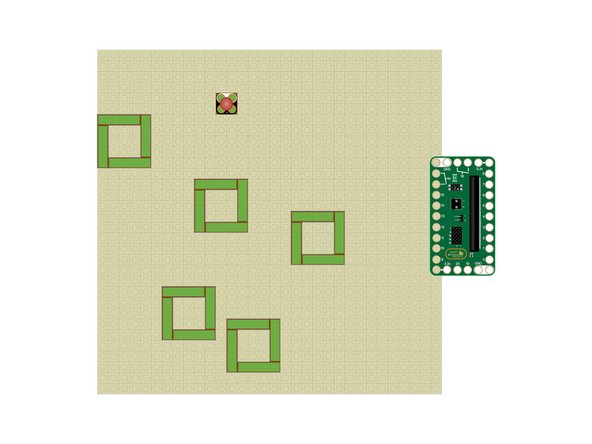
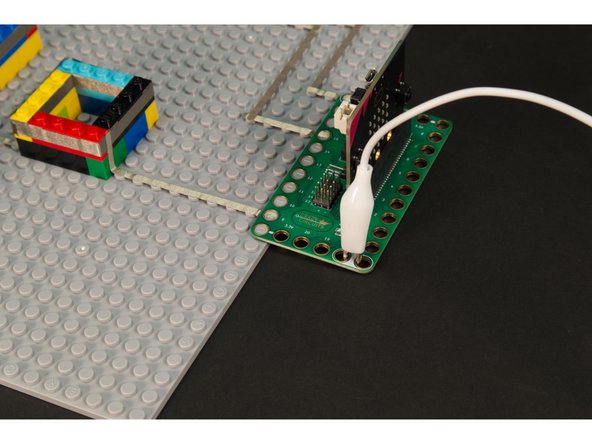
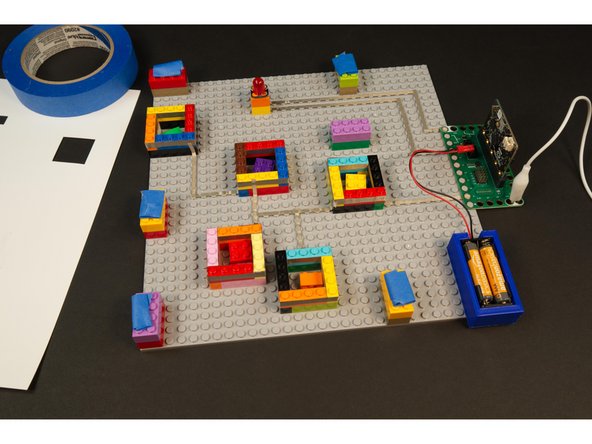
We're going to attach our Bit Board to the right edge of the LEGO baseplate. (We only need to connect Maker Tape to one side of the Bit Board.)
-
It doesn’t have to be in the exact position shown in the diagram, we just need to make sure we run the tape to the correct pins.
-
-
-
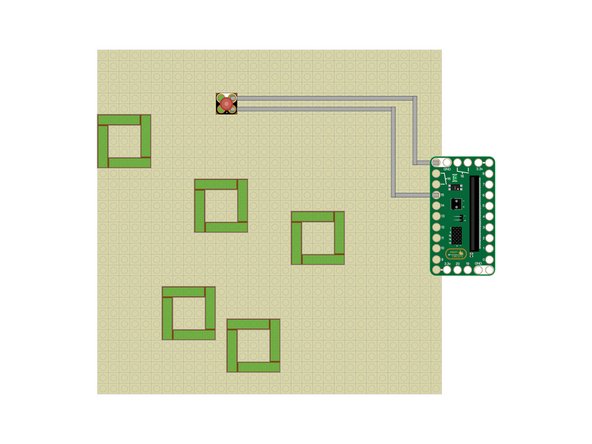
Connect the LED using 1/8” Maker Tape.
-
The white side of the LED should go to GND (ground) on the Bit Board, and the black side of the LED should go to Pin 15.
-
-
-
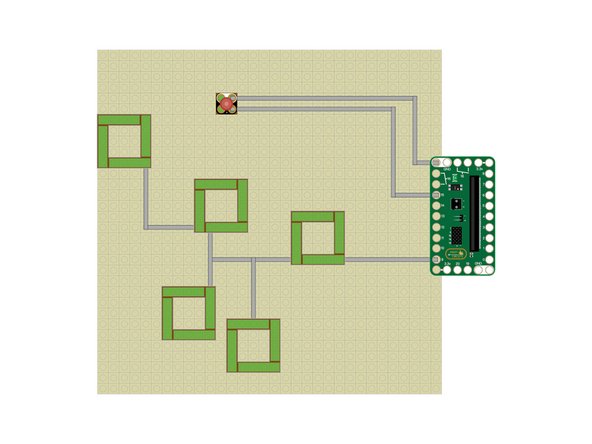
For our circuit to detect that the tweezers have touched the inside of a pocket we’re going to connect all of our pockets to Pin 9 on the Bit Board and then have the tweezers connected to GND with an alligator clip.
-
When the tweezers touch the Maker Tape, the circuit is completed and the micro:bit will play a sound and light up the nose.
-
We just need to connect all of the pockets to Pin 9 using 1/8" Maker Tape.
-
We can daisy chain all the pockets together, as shown in the diagram.
-
-
-
We’re going to make our own tweezers for our Operation Game!
-
We’ve tried to optimize the size of these tweezers to fit the rest of the game, making it a challenge, but not so difficult that it’s not fun!
-
To assemble the tweezers you’ll need 1/4” Maker Tape, two popsicle sticks, and a 1x1 LEGO brick (or some cardboard).
-
You’ll also need a ruler and something to mark the popsicle stick with. A pencil or a marker will do.
-
-
-
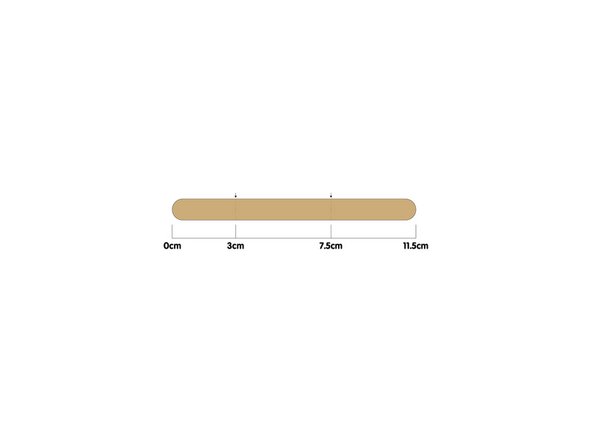
Note: The popsicle sticks we used are 11.5 centimeters long. If you have sticks that are a different length you may need to make adjustments.
-
Mark two points on the popsicle stick, one 3cm from the end, and one 7.5cm from the end.
-
-
-
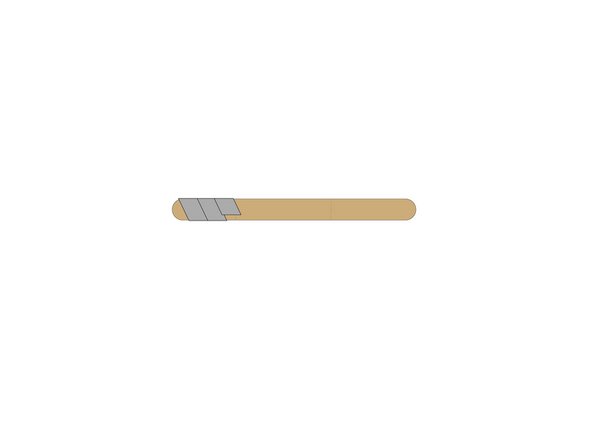
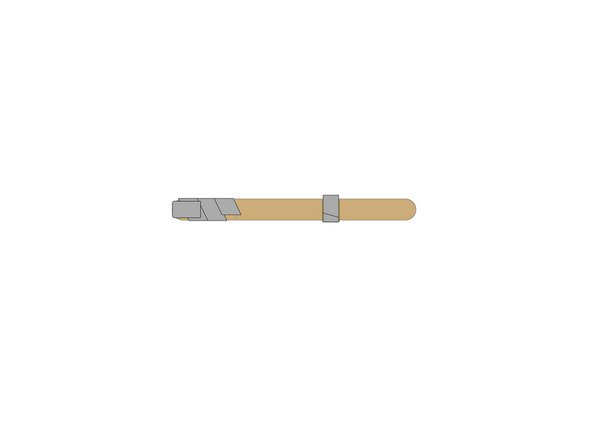
Wrap 1/4” Maker Tape around one end of each popsicle stick, so it covers the mark you made at 3cm.
-
Add one more piece of tape around the rounded end of the popsicle stick.
-
-
-
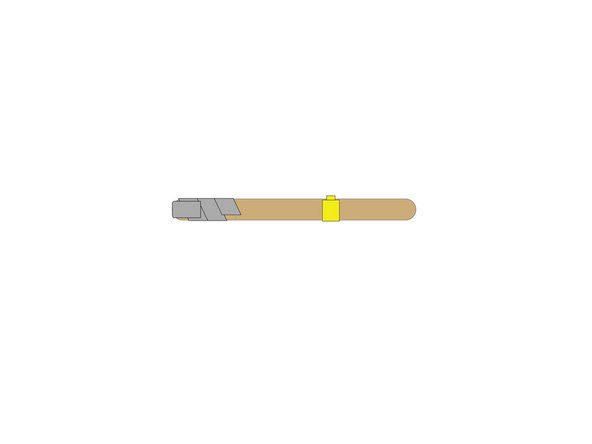
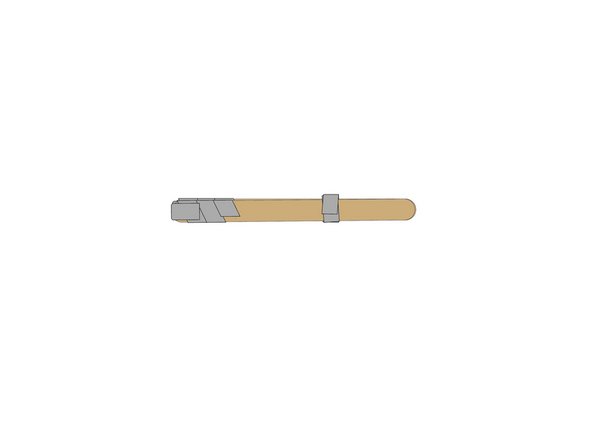
We’re going to add a 1x1 LEGO brick onto one of the popsicle sticks at the 7.5cm mark.
-
Wrap 1/4” Maker Tape around the popsicle stick and the LEGO brick to hold it in place.
-
If you don't have a 1x1 LEGO brick to use as a pivot point you can alternately make one using some rolled up cardboard. Just make it about 8mm in diameter and about 10mm tall.
-
-
-
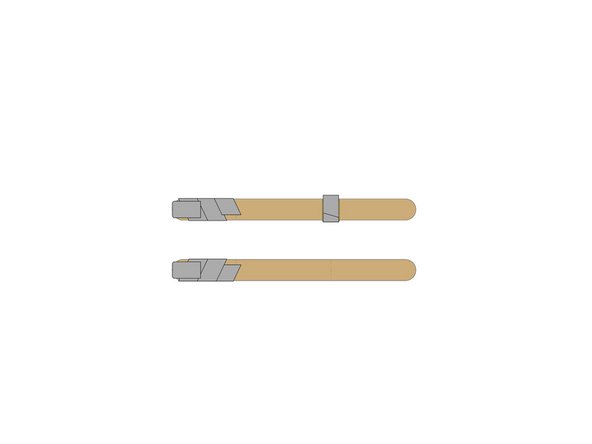
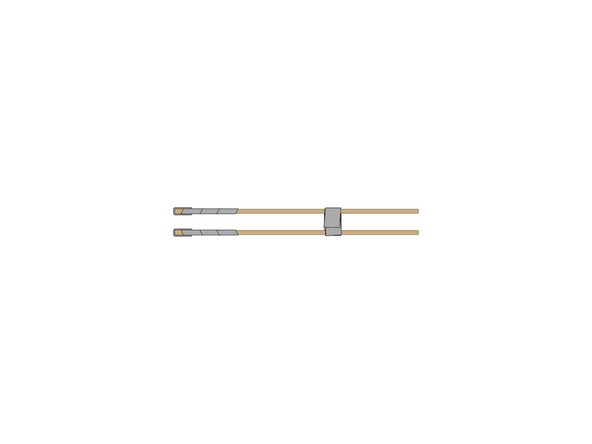
You should now have two popsicle sticks with Maker Tape wrapped on the ends, and one of them should have a LEGO brick taped to it. Time to combine them!
-
Line up the two popsicle sticks so the LEGO is between them to act as the pivot point, and wrap 1/4” Maker Tape around the outside of both sticks where the LEGO piece is located.
-
Don’t worry about wrapping it super-tight, we just need it to hold together for the next step.
-
Note: You don't have to use Maker Tape for this step, but since we had it handy, and it's a very strong tape, we used it.
-
-
-
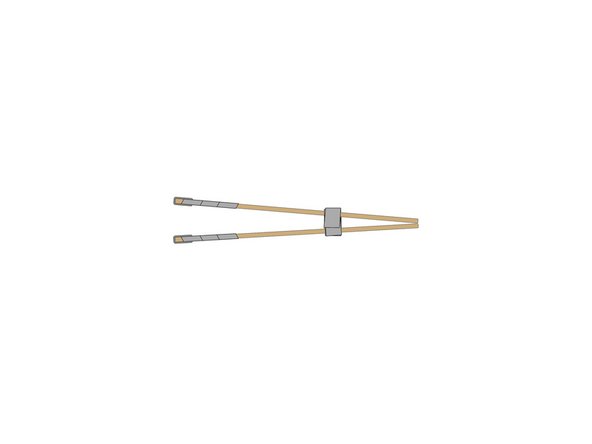
The popsicle sticks should have a good amount of flex to them, so we'll use that in our favor.
-
Pinch together the short ends of the tweezers and wrap them with 1/4" Maker Tape. This will hold them in the open position.
-
You should be able to squeeze the longer ends of the tweezers together.
-
If the popsicle sticks you are using don't flex enough you can try to use a rubber band around the pinched end instead of Maker Tape.
-
With the 11.5cm popsicle sticks we used they end up being the perfect size to create gameplay that is challenging but not too difficult.
-
Note: You don't have to use Maker Tape for this step, but since we had it handy, and it's a very strong tape, we used it.
-
-
-
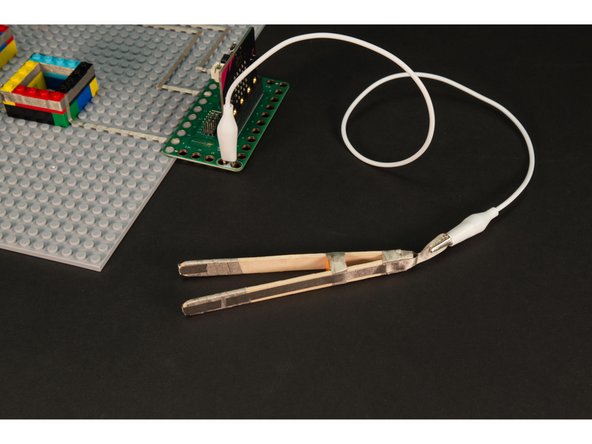
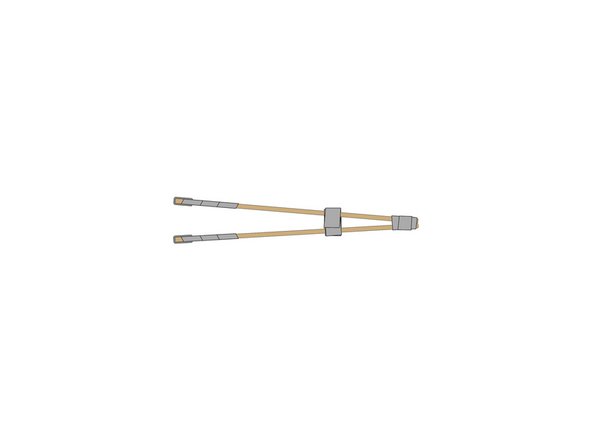
The last step for the tweezers is to run a piece of Maker Tape along the outer side of each popsicle stick and off the end to form a tail.
-
You can do this with one long piece or two separate pieces, as long as they connect (stick together) at the end.
-
We've now got all of our conductors (Maker Tape) connected together. The only thing left to do is connect an alligator clip to the tail.
-
-
-
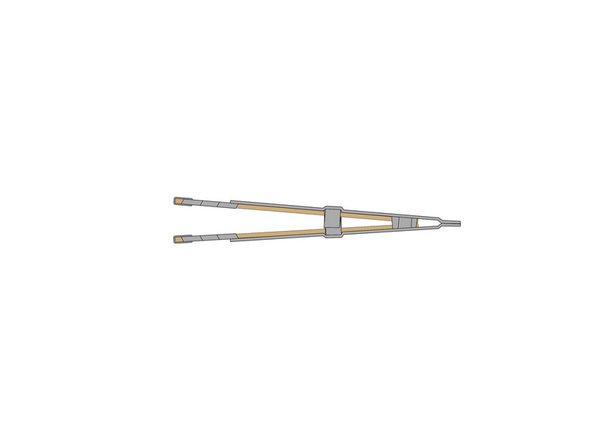
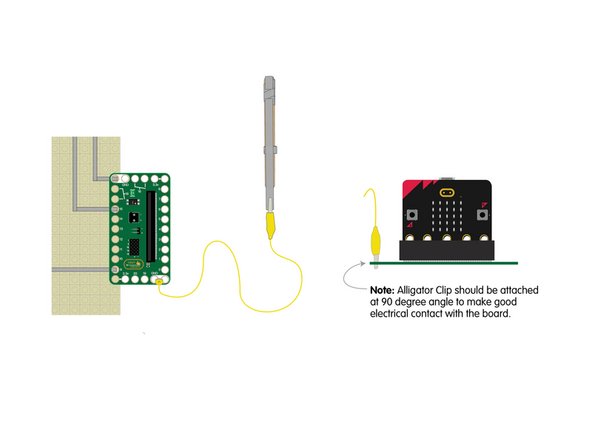
Connect the alligator clip to the GND (ground) pin on the Bit Board.
-
The alligator clip should be attached at a 90 degree angle to make good electrical contact with the board.
-
We've now completed the LEGO build and all of our electrical connections. Next we'll load the code so we can try it out!
-
-
-
Connect a USB cable to the micro:bit and then plug it into your computer.
-
We'll be using makecode.microbit.org to program our board. It uses a simple drag and drop block interface.
-
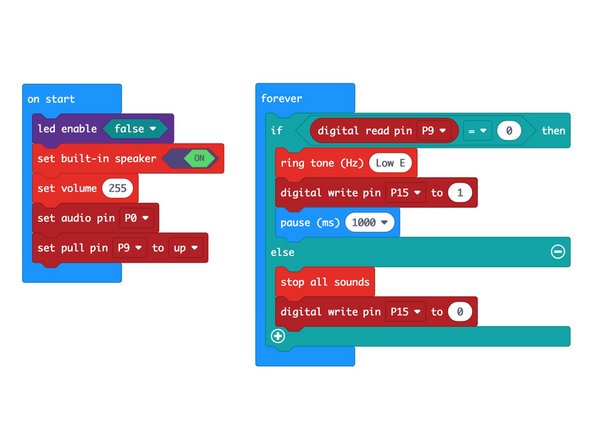
We're going to load the following code for our Operation Game program: https://makecode.microbit.org/_CuMf6Y8yk...
-
Note! This code uses the built-in speaker on the micro:bit V2. If you have an older model micro:bit it will not have a built-in speaker. See step 26 for adding an external speaker.
-
-
-
You can power this project with a USB cable, so if you just loaded the code, leave the cabled plugged in to provide power.
-
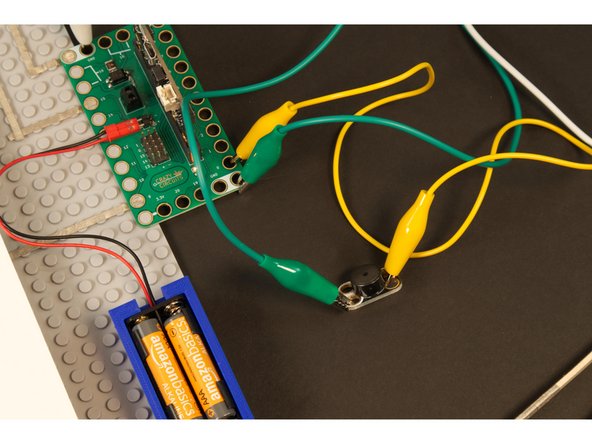
Alternately (as seen here) you can use a 2 AAA Battery Pack. (We used our 3D Printed Battery Holder which can snap right onto a baseplate.) Tape or rubber bands can also be used.
-
Touch the tweezers to the Maker Tape on the inside of one of the pockets. Did the LED nose light up and did you hear a sound? If so, it works!
-
-
-
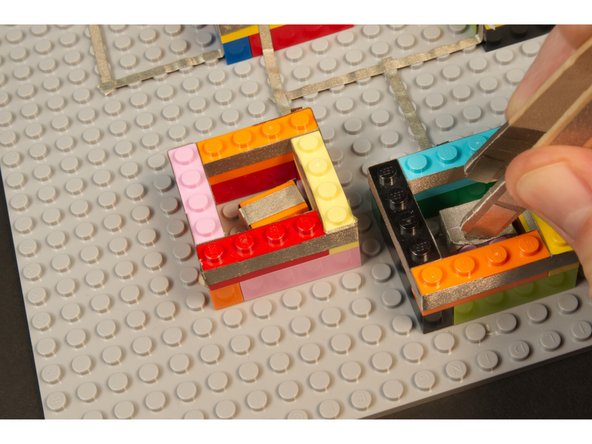
Our game works, but we're not quite ready to play it. We needs some parts to put in the pockets so we have something to pick up with our tweezers.
-
Since the pockets are 3x3 (in LEGO sizing) we found that a 2x2 LEGO brick is the most challenging, followed by a 1x2 LEGO brick.
-
Drop a 2x2 or 1x2 brick into each pocket and you're ready to test your skills!
-
Make sure the bottom of the LEGO is not facing up unless you want a really easy game! :)
-
-
-
How did you do? Were you able to remove all the parts easily? If so, here's how you can make it more difficult.
-
Right now if the tweezers touch the side of the pocket it makes the electrical connection and you lose your turn.
-
But what if the part you are grabbing touches the side of the pocket?
-
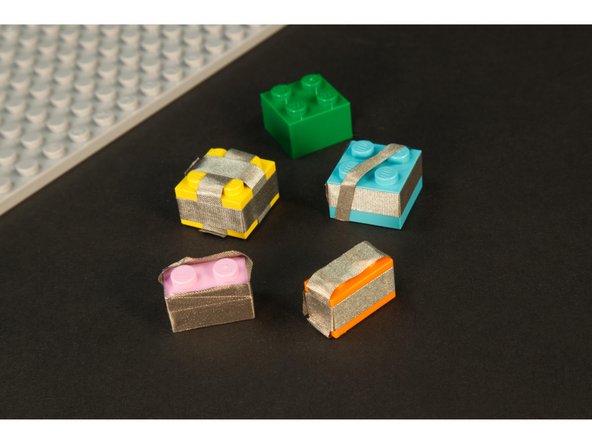
We can make the parts (our 2x2 or 1x2 LEGO bricks) conductive by just wrapping them with Maker Tape!
-
The amount of Maker Tape wrapped around a part will determine how difficult it is to remove.
-
Add just a little Maker Tape, or wrap it around all the sides!
-
If the tweezers are touching the Maker Tape of a part, and the part touches the Maker Tape on the pocket, the circuit will be completed, and the buzzer will sound!
-
-
-
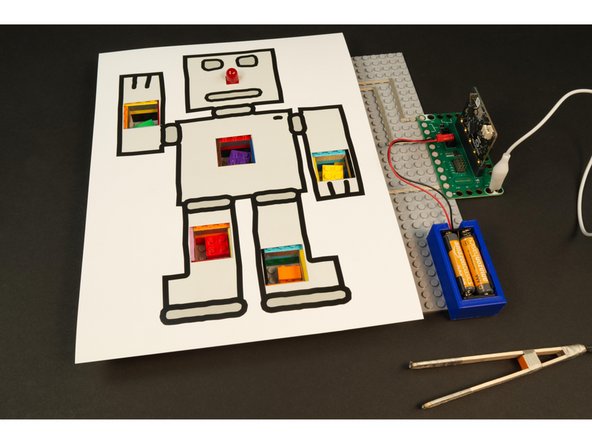
Everything should be working now… you’ve got a functional circuit, and the parts are ready to go… the only thing missing is the robot we made in Step 2.
-
We added a few bricks two levels high around the perimeter of the baseplate so our paper robot could rest on top of them.
-
We also added a few pieces of tape to hold our robot in place. If the template covers the edges of the pockets your tweezers may not make contact with the Maker Tape.
-
-
-
Give it a try and see how you do!
-
Our tweezers at rest are just over the width of the inside of the pocket, so you have to start squeezing them before you attempt to pick up a piece.
-
We found this made the game more challenging!
-
If you need a less challenging game you can make adjustments as needed.
-
-
-
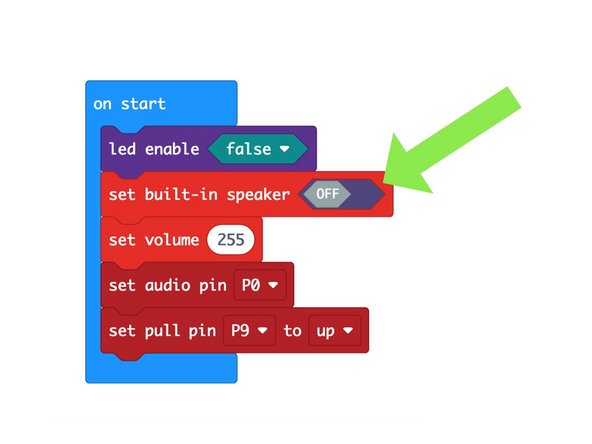
If you've got a micro:bit 1.5 or older it will not have a built-in speaker, but we can add one!
-
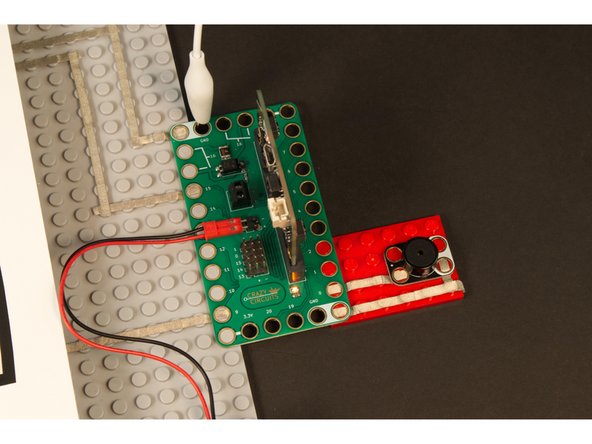
We'll connect the Crazy Circuits Piezoelectric Speaker Chip to our circuit.
-
Since we've got the Bit Board hanging off the side of the LEGO baseplate, and we need to use Pin 0 and GND, we'll just add on a little 4x7 LEGO plate.
-
Add Maker Tape as shown, and then adjust the code so you have the set built-in speaker block to OFF.
-
If you don't have a suitably sized small plate you can also just use alligator clips to connect the piezo speaker.
-
-
-
Now that you've built a basic Operation Game, how can you make it even better?
-
You could connect each pocket to a different pin on the micro:bit so they each have their own sound.
-
You could create a new template and/or add more pockets to add even more parts to the game.
-
You could make an even larger game by combining multiple baseplates together! This would allow you to add even more pockets and parts!
-


Cancel: I did not complete this guide.
One other person completed this guide.
Attached Documents
