Introduction
Create this fun, light-up version of the classic name tags found in our LED Paper Name Tag Classroom Set.
The Attached Documents section at the bottom of the page contains a single PDF file with step-by-step instructions, the name tags, and a troubleshooting guide for facilitators.
Video Overview
Featured Document
-
-
If you're using our LED Paper Name Tag Classroom Set it will have all the components you need. You'll just need to supply scissors and writing utensils.
-
Alternately, you can print the paper name tags file attached to this guide, and use LEDs, Batteries, and Maker Tape found in our Paper Circuits Kit.
-
You'll need to use a safety pin to attach the name tag, or you can use string or other attachment methods.
-
Once you've got all your parts sorted you can make a LED Name Tag!
-
-
-
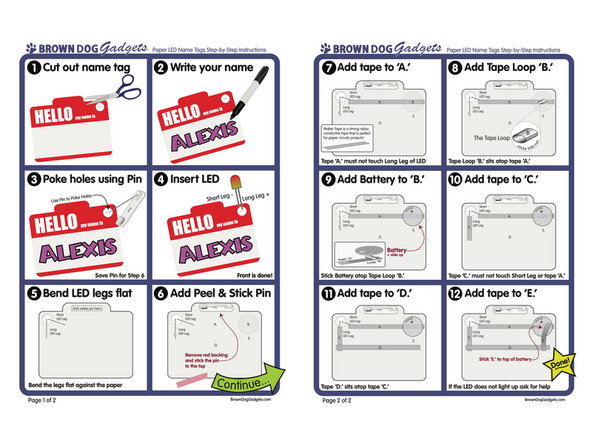
We'll start by cutting out the name tag with scissors.
-
-
-
Use a marker, colored pencils, crayons, or other writing utensils to write your name.
-
Now's the time to get creative! You can use any lettering you want, use multiple colors, and even add some drawings or doodles.
-
-
-
Use the Peel & Stick Pin to poke holes through the front of the Name Tag so you can thread the LED legs though.
-
If you are not using the kit you can use a safety pin or a push pin to make the hole.
-
-
-
Insert the LED, making sure to orient the legs properly.
-
The Long Leg is Positive, and needs to go towards the outside edge of the Name Tag.
-
-
-
Bend the LED Legs flat against the paper.
-
Note the Long Leg of the LED is towards the outside edge of the name tag.
-
-
-
The kit contains a Peel & Stick Pin that will be attached so you can easily wear the Name Tag.
-
Remove the piece of backing film from the pin and stick it down.
-
-
-
We're ready to start building our circuit!
-
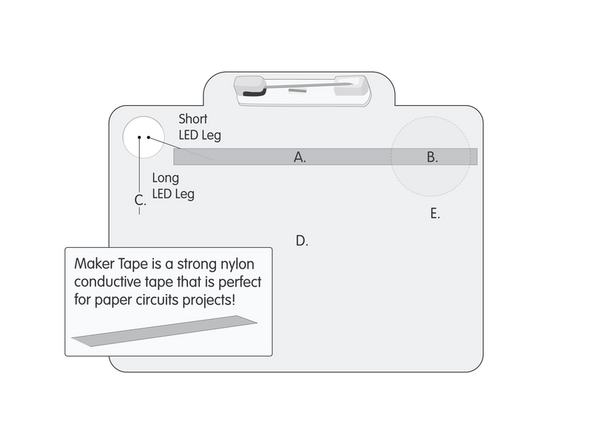
Measure, cut, peel, and stick a piece of Maker Tape down as indicated atop the letter 'A.'
-
The tape should hold down the Short LED Leg so it makes the electrical connection for our circuit.
-
-
-
Use Maker Tape to create a Tape Loop (with the sticky side facing out) and stick it down to the right side of the tape strip 'A.'
-
The Tape Loop should be about half the diameter of the Battery. (You can use the battery outline circle as a guide.)
-
If the Tape Loop is too large it may short out the battery.
-
-
-
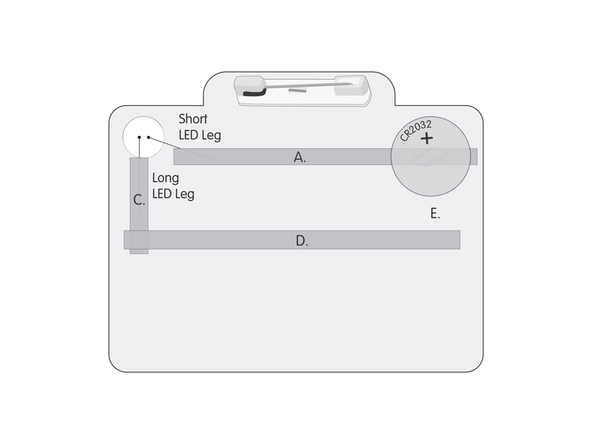
Stick the Battery atop the Tape Loop ‘B.’ with the Positive (+) side up.
-
The Battery should stick down to the Maker Tape securely and the tape will hold it in place.
-
-
-
Measure, cut, peel, and stick a piece of Maker Tape down as indicated atop the letter 'C.'
-
The tape should hold down the Long LED Leg so it makes the electrical connection for our circuit.
-
-
-
Measure, cut, peel, and stick a piece of Maker Tape down as indicated atop the letter 'D.'
-
Make sure the tape overlaps the piece of tape you added to 'C.'
-
We're almost there! Just one more piece of tape...
-
-
-
Measure, cut, peel, and stick a piece of Maker Tape down as indicated atop the letter 'E.' and press the tape down atop the Battery.
-
Once 'E.' is in place, connecting 'D.' and the Battery, your Name Tag should light up!
-
-
-
Wear your Name Tag and look totally awesome!
-
-
-
The attached PDF document below contains these step-by-step instructions, a set of printable name tags, and a troubleshooting guide.
-
The troubleshooting guide can assist if you come across a name tag that isn't lighting up. It contains a useful checklist to diagnose any problem(s).
-
We've run this workshop with thousands of educators and nearly everyone walks away feeling comfortable and confident with the activity,
-