
Introduction
We added a relay to the Bit Board so you can easily control external circuits using the micro:bit. Note that V2 of our Bit Board does not have a built-in relay but you can easily add a Relay Module.
Video Overview
Featured Document
-
-
A relay is a basically a switch that can be controlled electrically. Think about how a light switch operates. You use your hand to turn the switch on, and to turn it off. With a switch like a relay you can programatically control it with code based on certain conditions.
-
Maybe you want to turn on the switch/relay so it will power on a fan when it gets to warm in your room. With a temperature sensor you can check for a certain temperature and then take action.
-
Relays are also used to allow control of a large amount of current with a small amount of current. Car headlights can draw a large amount of current, and could easily melt or damage the switch or wiring that you use to turn them on, so the switch for your headlights controls a relay that can handle the high current of the circuit.
-
Some relays are "electromechanical" and use an electromagnet that physically pulls a metal switch closed. Other relay use an optocoupler (or opto-isolators) which consists of an LED and a phototransistor.
-
-
-
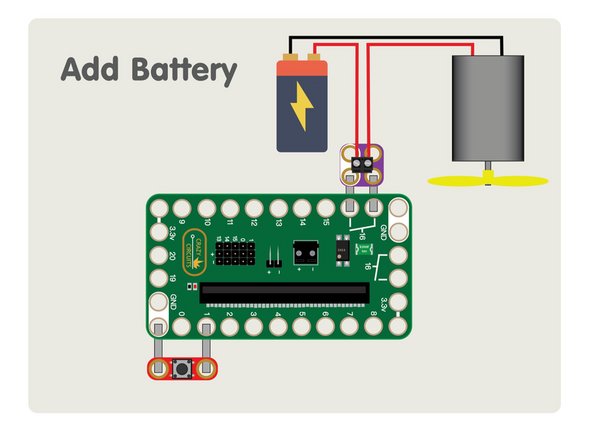
We'll first build our circuit that will take input from a button and turn on the relay.
-
Using Maker Tape connect a pushbutton to Pin 1 and GND. This will be used to tell the micro:bit to turn the relay on.
-
Connect Maker Tape to one set of the relay connections on the Bit Board, and then add a Screw Terminal.
-
Don't have a Screw Terminal Chip? Check out our guide for Tape to Wire Connections.
-
Since the relay is a "smart switch" we could use a sensor, or potentiometer, or anything else you can connect to the Bit Board as an input as a trigger. You could even set the relay to turn on and off just using code.
-
We used a Screw Terminal to make it easy to connect our external circuit, but you can always use the Tape to Wire method as well.
-
-
-
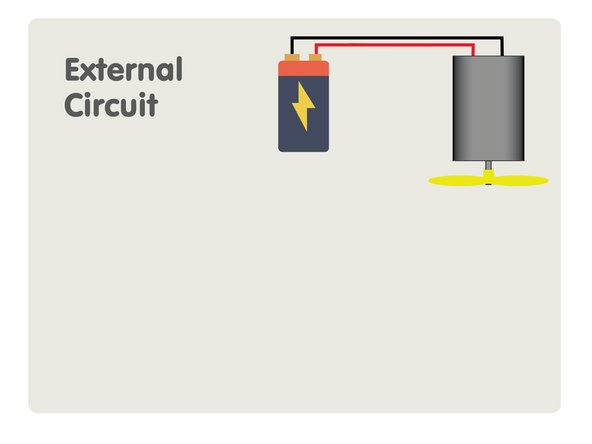
Our external circuit consists of a battery and a small DC motor with a fan blade attached to it.
-
This circuit can exist completely on its own, and the only thing really missing is a switch to turn in on and off, so we'll add one by connecting one side of the circuit to our relay.
-
Once we have our motor and battery added and we've connected the wires to the Screw Terminal, we're ready to turn it on!
-
-
-
We like to use makecode.microbit.org to program our micro:bit. It uses a simple drag and drop block interface.
-
As you can see in the image, the code is very simple! If you don't want to type it you can get it here: https://makecode.microbit.org/_EzFXpxLy2...
-
This code is pretty much the same as you would use to turn on an LED. In fact, it is turning on an LED, since the optocoupler in the relay uses one to complete the circuit.
-
Setting Pin 16 to 1 will turn on the relay, and setting it to 0 will turn off the relay. Our "smart switch" really is that simple!
-
-
-
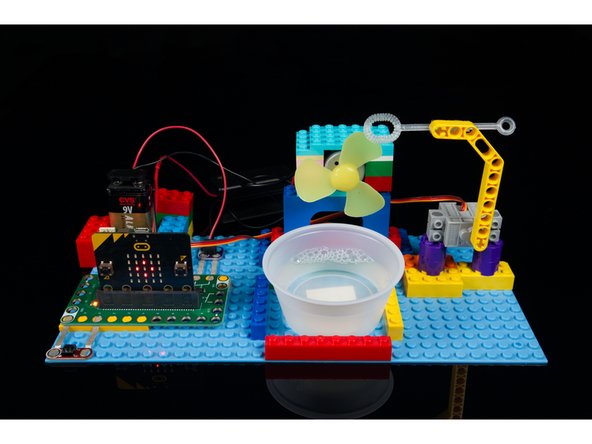
So what can you do with the Bit Board relay? We built a Bubble Machine that can entertain children and dogs!
-
Maybe you want to check a bucket's water level and turn on a pump to remove water if it gets to full. You can do that with a relay.
-
Perhaps you want to turn on a set of battery-powered fairly lights when you enter your room? You can use an ultrasonic sensor and a relay to make that happen!
-
Think of the Bit Board Relay as a smart switch you can control... it's up to you to come up with some wild ideas. :)
-


Attached Documents
