
Introduction
Connect a Capacitive Touch Sensor to a Bit Board and control it with code. A "Cap Touch" sensor is a type of switch, but instead of closing a contact it looks for a change in capacitance, which happens when you place your finger near the sensor.
Video Overview
Featured Document
-
-
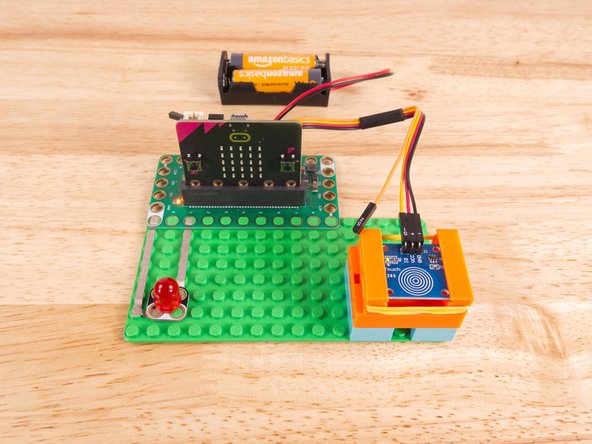
We'll connect the Capacitive Touch Sensor with a Crazy Circuits Ribbon Cable using just three of the wires.
-
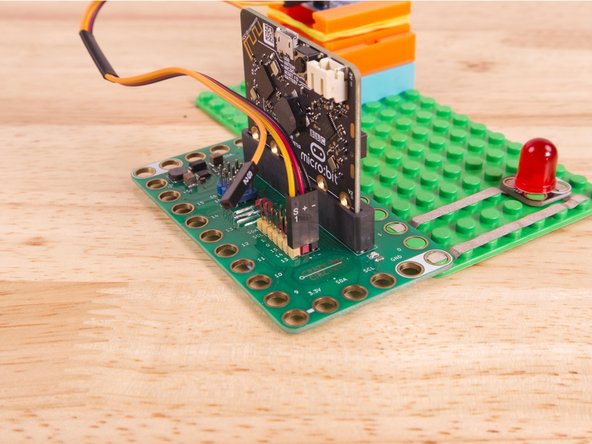
Start by plugging the connector with the three wires in it (Black, Red, Yellow) into the Pin 13 row of the Bit Board. (Make sure the Black wire is in - and the Yellow wire labeled S1 is closest to the number 13 on the Bit Board.) The Orange wire (labeled S2) does not get plugged in and can hang loose.
-
Now we'll connect the other end of the Ribbon Cable to the Capacitive Touch Sensor. S1 (Yellow) goes to IO, and then + (Positive) goes to VCC and - (Ground or Negative) goes to GND.
-
-
-
We used a 3D printed holder we designed to hold the Cap Touch Sensor in place on the LEGO baseplate.
-
(We don't have a specific holder for the Cap Touch Sensor but the 7 Segment Display Holder should work just fine.)
-
Alternately you can use some LEGO bricks and a rubber band or tape to hold the sensor in place. (But don't use anything conductive!)
-
And be sure to check out the 3D Printed Component Holder Guide if you want to design & print your own at any size.
-
-
-
If you've never used a micro:bit before you'll want to check out this guide: Bit Board V2 Setup and Use
-
We're going to load the following code for our Cap Touch Toggle program: https://makecode.microbit.org/_DazcPaWxT...
-
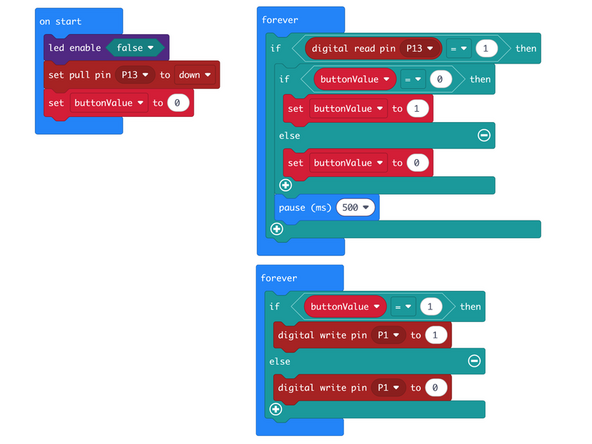
In the on start block we'll set Pin 13 to down for the Capacitive Touch Sensor, which is the opposite of what we usually do with a standard pushbutton.
-
We'll also set a variable named buttonValue to track if the sensor is "on" or "off".
-
In our first forever block we'll check for the sensor to be triggered and then check the current buttonValue. If it is 0 we'll set it to 1, and if it's 1 we'll set it to zero. (Basically a flip-flop operation.) We also pause a half second.
-
In our second forever loop we will test the buttonValue to see if it is 1 or not. (If it is not, we do the else part of our if/else statement.)
-
-
-
Once the code is loaded it should start running immediately.
-
You can power the micro:bit via the USB cable you used to load the code or you can use a battery pack plugged into the Bit Board.
-
Touch the sensor with your finger and the LED should light up. Touch it again and the LED will turn off. This is a basic toggle switch.
-
If you hold your finger in place on the sensor you'll see that it blinks. This is due to our code just checking for a single press and then pausing for 500 milliseconds and looping around again.
-
If you try to tap the sensor rapidly you'll see that it doesn't respond to quick-fire pressing. This is due to the 500 millisecond delay. (We'll deal with that in the next guide.)
-
-
-
As mentioned the Capacitive Touch Sensor can detect when a finger (or other conductive object being held) touches or comes close to the pad of the sensor.
-
In this video you can see how the sensor gets triggered by just putting a finger close to (but not touching) it, and that you can even put an object (in this case, a piece of paper) in front of the sensor.
-
Here's an excerpt from a post about capacitive sensors:
-
"The sensor works by measuring changes in an electrical property called capacitance. Capacitance describes how two conductive objects with a space between them respond to a voltage difference applied to them. When your finger, a conductive object, touches the device (screen), it changes the capacitance of the sensor."
-
For a more in-depth study read the full post about capacitive touch sensors.
-
-
-
We've got one more trick with the Capacitive Touch Sensor. If you flip it over you'll see a silver pad on the PCB (Printed Circuit Board) and we can use that to extend our reach.
-
Connect a piece of Maker Tape to the silver pad and run it far from the sensor. You can see in the video we made a little zig-zag pattern, but we've also successfully ran a piece of Maker Tape across a room!
-
In the video you'll see that we were able to trigger the sensor by just waving a hand above the Maker Tape. The tape sort of acts like an antenna to amplify the sensors reach.
-
One thing worth noting is that not everyone is the same! You might be able to trigger the sensor from afar while someone else needs to reach closer.
-
Capacitive Touch Sensors can be affected by then environment, and things like humidity, as well as from the differences between people's bodies.
-
-
-
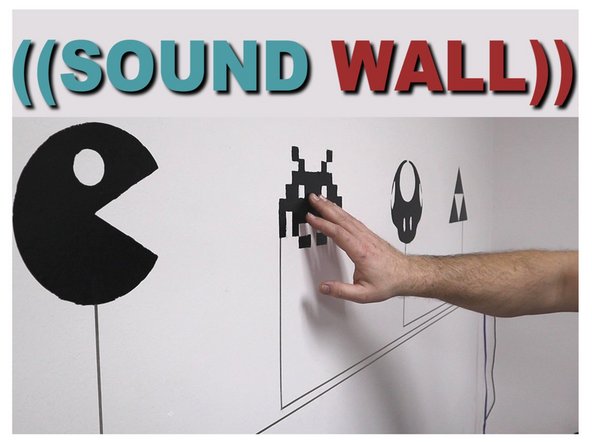
Our Sound Wall project (from 2020) used a different microcontroller but could be built using a micro:bit along with a few of the Capacitive Touch Sensors and an MP3 Player.
-
We have a guide on using the MP3 Player with the micro:bit so it would mainly be a matter of replacing the buttons with Cap Touch sensors.
-
By connecting Maker Tape to the back side of the Cap Touch Sensor we can build touch points far from the micro:bit and build bigger projects with unique touch trigger capabilities.
-
-
-
Follow along with our recorded Live Stream!
-
You can watch the full video of us walking through this project, along with explaining and exploring the code: https://www.youtube.com/live/tgQ9Y5K9t2I
-


Attached Documents
