
Introduction
Expanding on the Simple Programable Touch Piano project, this Piano/Synth uses Bare Conductive Paint as interactive Touch Points. This is a great example how to create a large scale or wall Piano for a library or classroom. Overall the project is no more difficult than the Simple Touch Piano, it just requires a paint brush.
Video Overview
Featured Document
-
-
Print off the Piano Key Stencil. (Also found at the end of this guide.)
-
Use some fancy paper cutting skills and turn that print out into a stencil.
-
Tape the stencil to your work area and use Bare Conductive Paint to paint piano keys.
-
Let dry. Then run conductive tape from your Invention Board and over each key.
-
While you don't need to, you can then over the parts of your tape that go over the paint.
-
Bare Conductive Paint is water soluble. That means that any moisture on your hands will start to melt the paint. To protect it, apply a clear coat spray paint over the top of it. This won't cause any issues with the Capacitive Touch.
-
No, seriously. Throw on a quick coat of spray paint. Otherwise just use some aluminum tape from the hardware store to make keys.
-
It should go without saying that you don't NEED to make Piano keys. Giant dots or stenciled letters (that align to the note thats being played) work beautifully in a classroom or library.
-
-
-
Start with an 8x16 sized brick plate.
-
Create a raised platform for your Invention Board to sit on. Use either thin brick plates or larger brick blocks.
-
Creating a platform is necessary because there are only holes around the outside of the Invention Board.
-
-
-
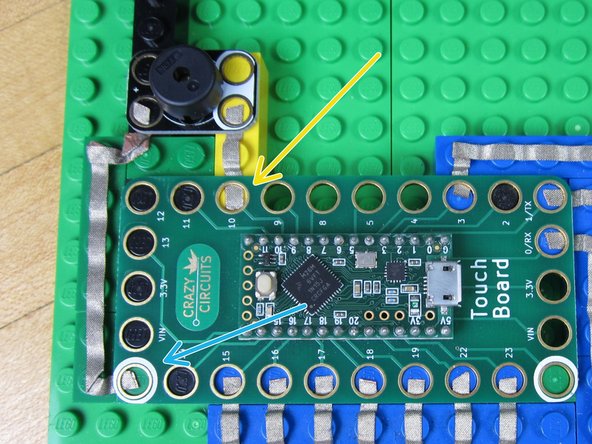
Connect Pin 10 to one side of the Piezo Speaker.
-
Connect the other side to Ground.
-
Our Piezo Speaker has a White and a Colored side, however it doesn't matter which side you use for the Pin 10 connection and Ground connection.
-
-
-
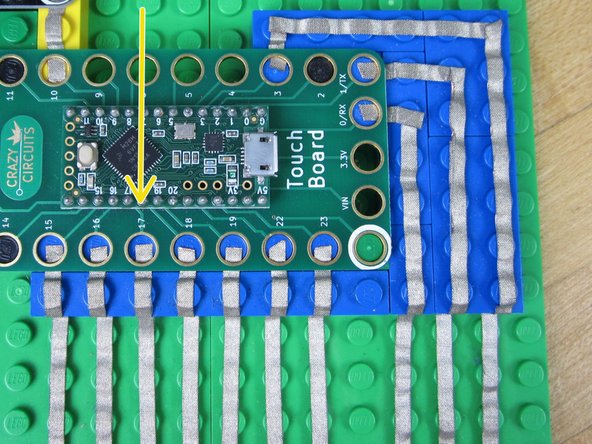
There are 11 Touch Pins that can be used for this project. We used 10 Touch Points in our example, but you can use all 11 or fewer.
-
Run your tape from a Conductive Paint Touch Point to a Pin on the Invention Board. The Conductive Tape should overlap your Conductive Paint area for half an inch or more.
-
Pins 15, 16, 17, 18, 19, 22, 23, 0, 1, 3, and 4 are all Touch Points and are set up to play notes with our code.
-
While you typically don't need to, you can always paint over the overlap area of your Tape and Paint.
-
-
-
If you've not used your Invention Board before you should read the Invention Board User Guide. Practice uploading code before doing this project.
-
Open up your Arduino Software.
-
Download the Teensie Piano code file. (Found at that link.)
-
Copy and paste that code into your Arduino software window.
-
If you're not changing anything, just upload the code. Otherwise go to the next step to see how we change things up!
-
-
-
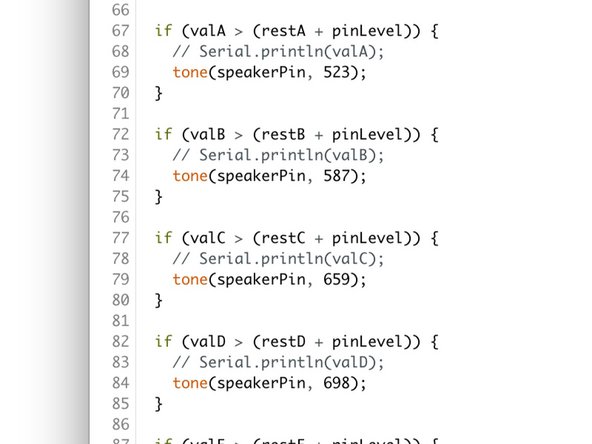
You can change the type of tone (note) that each Touch Point makes by changing number values in the code.
-
For example, the code that determines the sound that Pin 15 makes is controlled by the code between lines 67 - 69. (Line 15 says that Pin 15 gets called touchPinA in the rest of the code.)
-
Specifically: tone(speakerPin, 523);
-
What this code says is that when the Touch Point of pin 15 is activated, the Piezo Speaker will play a tone at a value of 523 Hertz, or what a musician would call a C note.
-
To change the value just change that number. You can find a full list of what musical note corresponds to what Hertz value on this website.
-
Once you're done, upload the code.
-
-
-
Once the code has been uploaded it will run automatically whenever the Invention Board is powered on. This can be from a computer or from a wall USB port.
-
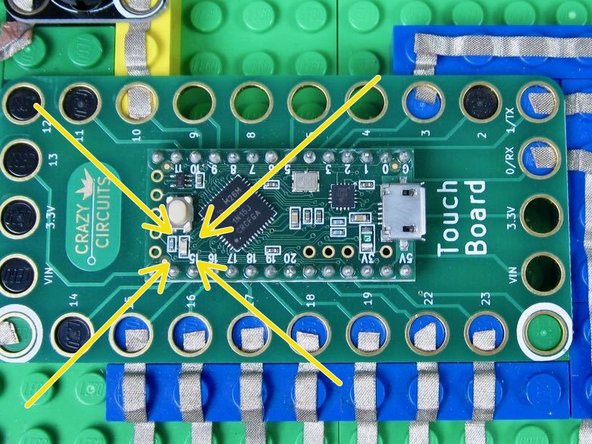
When it first turns on it will take 3-5 seconds to Calibrate. This means the board is sensing what is attached to the various Touch Points. During this time you should not touch anything.
-
The Invention Board shows when it's Calibrating by turning on a small LED in the middle of the Invention Board. Once that LED turns off, you can start to use the piano.
-
-
-
Did you let your Invention Board Calibrate for 4-5 seconds when you first plugged it in?
-
Did your code upload properly? (Refer to the Invention Board User Guide)
-
Is your Piezo Speaker hooked up to the correct pin? Make sure that whatever pin it's physically hooked up to is the same as the pin designated in the code. (Step 6)
-


This project is a great crowd pleaser and easy to expand into many formats. Paint, dough, aluminum tape, conductive fabric, cups of water, or even people can be used as Touch Points. Experiment with different materials and find what works best for you.
This project is a great crowd pleaser and easy to expand into many formats. Paint, dough, aluminum tape, conductive fabric, cups of water, or even people can be used as Touch Points. Experiment with different materials and find what works best for you.
Attached Documents
