
Introduction
Note: This is a project that predates our Rover Tank. This is a complex project requiring many components. We recommend you look at the simplified Rover Tank Body guide instead.
This remote was built to work with our LEGO Tank (Prototype).
Video Overview
Featured Document
-
-
You're probably familiar with remote controls. Usually you press a button and something happens!
-
You may have used a remote control to open a garage door or to change the channel on a TV.
-
Some remote controls use infrared light (like the TV remote) and some use radio signals (like the garage door remote).
-
Our Remote Control system will use the Bluetooth radios built into the micro:bit so one micro:bit can send signals to another micro:bit
-
Our first micro:bit will be a transmitter (which sends signals) and our second micro:bit will be a receiver (which receives the signals).
-
Since our LEGO Tank (Prototype) already has a micro:bit to make it move we just need to build a transmitter and then update the code to make it work.
-
-
-
We'll need to connect two thumbsticks using F/F Jumper Wires. You'll need just three wires per thumbstick.
-
Plug the Left Thumbstick VRX into Pin 1, +5V into the + (positive) column, and GND into the - (negative) column.
-
Plug the Right Thumbstick VRX into Pin 0, +5V into the + (positive) column, and GND into the - (negative) column.
-
Make note of the orientation of the thumbsticks! The connection pins are on top. If you rotate the thumbstick 90 or 180 degrees the direction you move the stick won't match the direction the tank moves.
-
We used our 3D Printed Thumbstick Holder and our 3D Printed Battery Holder but you can always get creative with LEGO, tape, and rubber bands.
-
-
-
Connect a USB cable to the micro:bit and then plug it into your computer.
-
We'll be using makecode.microbit.org to program our board. It uses a simple drag and drop block interface.
-
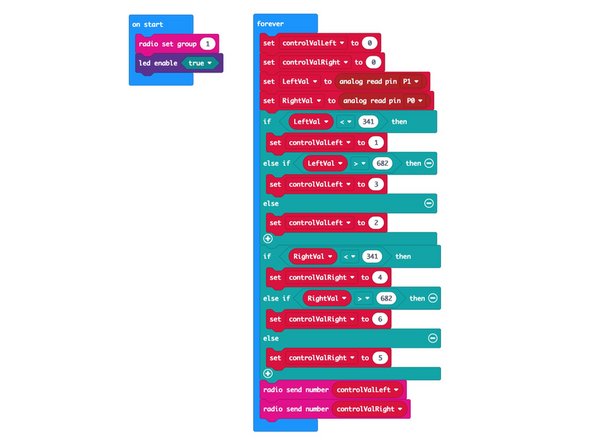
We're going to load the following code for our Tank RC Transmitter program: https://makecode.microbit.org/_U2xVirfvU...
-
-
-
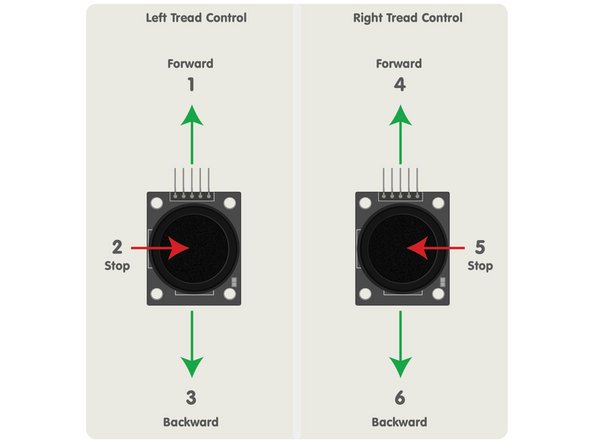
Each thumbstick will control a set of tracks. One for the left tracks, and one for the right tracks.
-
There are three positions; forward, reverse, and stop. Using combinations of those with the two sets of tracks will allow our tank to go forward, backward, turn left, turn right, and stop.
-
Since our thumbsticks are analog sensors we are just checking for a specific value to be higher or lower than the input.
-
There is no speed control with this method, but it is a feature that could be added with new code.
-
-
-
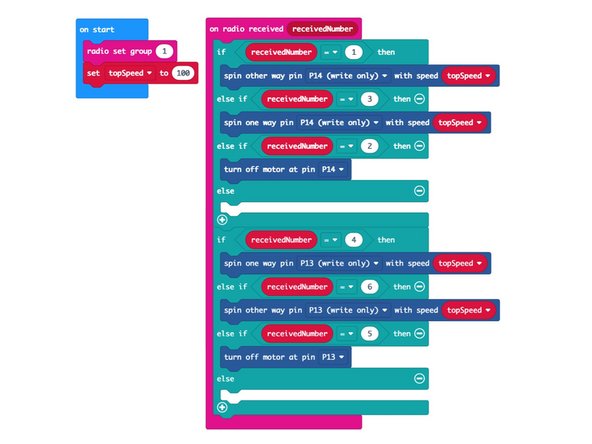
Before our tank will respond to the transmitter we'll need to update the code.
-
Load this version of the code for Tank RC Receiver: https://makecode.microbit.org/_bk505x2o1...
-
-
-
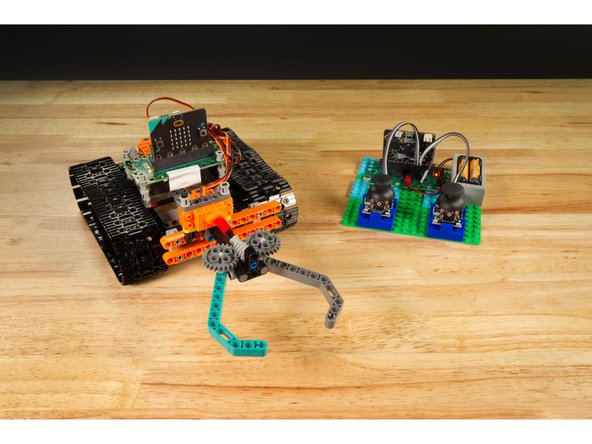
You're ready to test out your remote controlled tank!
-
We placed our tank top of some LEGO bricks for the test, just so we could more easily observe it. (And so it wouldn't roll away!)
-
Does the motion of the treads match the movement of the thumbsticks? If not, step through the guide again to make sure you've got it all right.
-
If everything is working as it should, enjoy your new Remote Control LEGO Tank!
-
-
-
How can we make our RC LEGO Tank even more awesome? How about adding a LEGO Gripper to grab things!?
-
Check out our guide on building a LEGO Tank Gripper (Prototype) and then add it to your tank!
-


Cancel: I did not complete this guide.
One other person completed this guide.
Attached Documents
