Introduction
The Bit Board Rover can take advantage of the built-in sensors found on the micro:bit, and we can use microphone to "remotely control" the Rover so it moves when it detects sound.
You might also want to check out our Rover - Light Activated guide which lets you control your Rover with a flashlight.
Tools
Parts
Video Overview
-
-
For this guide you'll need a completed Rover Main Body.
-
You'll also need something to make sound! It could be your own voice, or a classroom full of clapping students.
-
You can also use a speaker playing a sound. (A Bluetooth speaker connected to a mobile phone or tablet works great.)
-
Our Sensor Showcase covers using the sensors built in to the micro:bit. The microphone is covered in Step 11.
-
-
-
If you've never used a micro:bit before you'll want to check out this guide: Bit Board V2 Setup and Use
-
We're going to load the following code for our Rover Sound Detecting Simple program: https://makecode.microbit.org/_6V8DirKRE...
-
Note: This version of the code is a great starting point for this project. If you want to take it further examine the code for the Rover - Light Detecting Turner and consider using it for a starting point.
-
When you power on the Rover it will start moving while it runs a calibration routine to check for sound levels. (We'll cover the calibration in Step 3.)
-
Once the calibration is done the Rover will sit there waiting for the sound levels to go above the threshold that was set in the calibration routine...
-
-
-
Make sure to see the note at the bottom of this step.
-
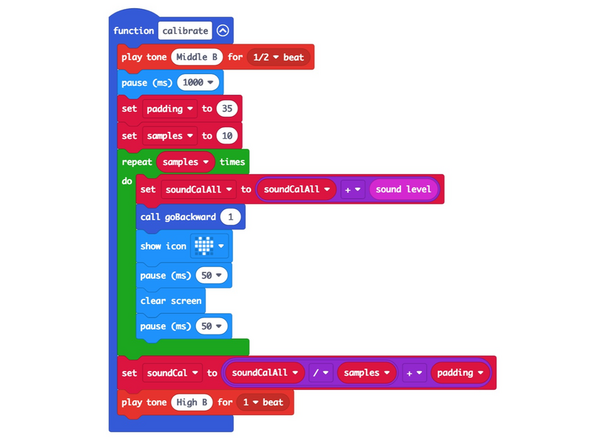
We need to calibrate the sound levels in the room before the micro:bit can tell if there is a sound.
-
The sound level can be anywhere between 0 and 255. (0 is very quiet and 255 is very loud.)
-
Our code takes 10 readings (with a slight pause between each reading) adds them all together and the divides by the number of samples (10 in this case) to get our final value.
-
Calibration routines often use this sampling technique where a number of values are captured and then the average of them is used.
-
Once we've calculated our ambient sound level we pad the number a bit to prevent false triggering. We used 35 for our pad value in this example but you can experiment with lower (or higher) values.
-
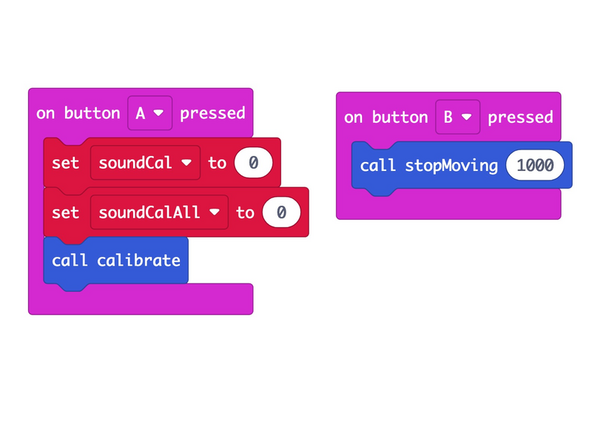
The calibration runs automatically when you power on the Rover but you can also run it by pressing the A Button on the micro:bit if you need to recalibrate.
-
Note: The Rover needs to move (or at least spin the wheels) when it calibrates! This is because the motors make noise, and we need to take that sound into account when doing the calibration.
-
-
-
Power on the Rover, and either set it down so it can roll, or hold it in your hand so the wheels can spin freely.
-
Do your best to be quiet and wait for the calibration to complete. Once the heart stops flashing on the micro:bit and you hear a second beep, the calibration should be done.
-
The Rover should be still when the room is quiet, so... Make some noise! Clap, yell, laugh... See if you can get the Rover moving.
-
You can make the Rover stop by being quiet. (Shhh!)
-
-
-
The code provided should serve as a starting point for your own ideas about how the Rover can react to sound.
-
You could program a sequence of movements, or with new code even add an accessory (like the Gripper, Lifter, or Sweeper) and then try to control them by making sounds.
-


