Introduction
You can build a simple remote control for your Rover using a second micro:bit and the battery pack that came with it.
If you want a more robust remote check out our Rover Thumbstick Remote.
Video Overview
-
-
If you've built the Rover Main Body and you have another micro:bit handy it's easy to add remote control to your Rover.
-
We'll load new code onto the Rover's micro:bit so it can act as a receiver, and we'll load code onto the second micro:bit so it can work as a transmitter.
-
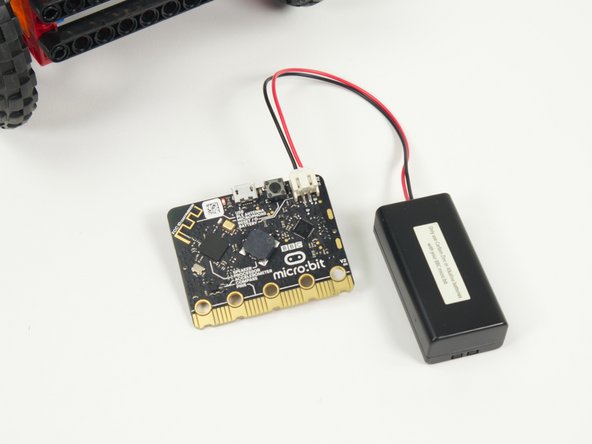
This is going to be a very basic remote control, so besides a micro:bit all you'll need is the battery pack that was included with your micro:bit or a USB Cable plugged into the micro:bit
-
Note that the battery pack used with the Bit Board will not plug directly into a micro:bit on its own - it will only plug into a Bit Board.
-
We need to be able to make the Rover go forward, backwards, and turn left and right, so we need to send the corresponding commands for those four things.
-
Since the micro:bit only has two buttons we'll instead use the built-in accelerometer to determine the rotation of the micro:bit and use that as our input.
-
Our remote will make the Rover go forward when tilted forward, and go backwards when tilted backwards. We'll use the two buttons to turn left and turn right. (Turning will only take affect when the remote it tilted forward or backwards.)
-
-
-
If you've never used a micro:bit before you'll want to check out this guide: Bit Board V2 Setup and Use
-
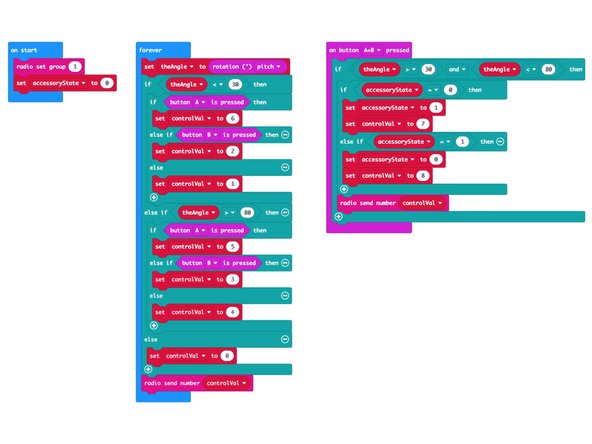
We're going to load the following code for our Rover Simple Remote RX program: https://makecode.microbit.org/_LUR6P29A4...
-
Once you load the code it won't do anything. Since the code turns the micro:bit into a receiver it will wait until a transmitter sends data before it does anything.
-
If you look at this code you'll see a number of functions; goForward, goBackward, turnLeft, turnRight, stopMoving, as well as two more, gripperOpen and GripperClose.
-
Each function is called when the receiver gets a specific number sent from the transmitter.
-
The RX stands for "Receiver". For the code we'll load onto the second micro:but you'll see TX which stands for "Transmitter".
-
-
-
Let's load the code onto the second micro:bit so it can function as a transmitter and send control signals to the micro:bit on the Rover.
-
Load the following code: Rover Simple Remote TX program: https://makecode.microbit.org/_Ago3tAVxR...
-
If you've got the Rover you programmed in the previous step nearby make sure it isn't powered on when you load the code on your transmitter or it may roll away unexpectedly!
-
-
-
Once you've got code loaded on both micro:bits you can test using the remote control with your Rover.
-
Tilt the "Remote" micro:bit forward and your Rover should roll forward. Tilt it backwards and the Rover should roll backwards.
-
To turn left, press the A button while tilting forward. To turn right press the B button while tilting forward. (You can also press A or B when tilting backwards!)
-
-
-
We've added one more surprise to our remote. If you built the Rover Gripper you can control it with the remote by press the A and B buttons at the same time.
-
The Gripper will toggle between opened and closed with each press of the A and B buttons. The code keeps track of the position of the gripper. (You should start with the Gripper in the open position.)
-
Using the remote can take a bit practice, but it's a great minimal way to add remote control capabilities to the Rover.
-
Note that the gripper will only be activated when the Rover is not moving.
-
-
-
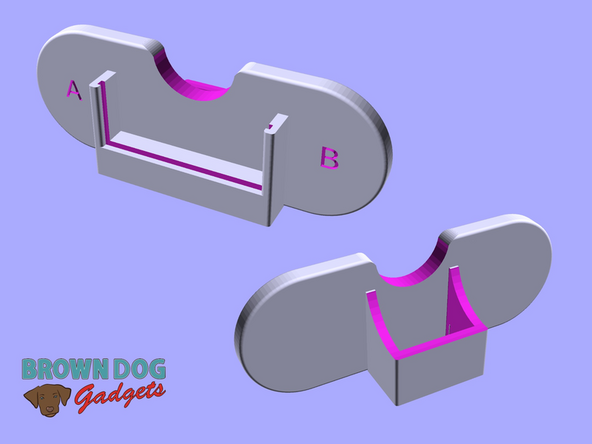
If you find holding the micro:bit and battery pack a little awkward, we've designed a 3D printed holder for you. Check out the: micro:bit Holder
-